Strike Fire Orbs Destiny 2 Warlock Easy
Destiny 2: The Best Warlock Builds For PvP And PvE
Uncover the true potential of each Warlock subclass with these in-depth builds for PvE and PvP.
Table Of Contents
With Destiny 2: The Witch Queen introducing new avenues to customize a Guardian's Subclass, players have been looking towards the current sandbox and creating new builds to farm the hardest content, both in PvE and the Crucible.
Out of every class, Warlocks have some of the strongest options. Great Subclasses and Exotics allow for powerful build combinations that can be taken further with certain weapons or seasonal mods. Ranging from aggressive dashes to chaining grenades infinitely, here are ten Warlock builds that are sure to impress in either PvE or PvP.
Foreword
Before we begin, each build guide is rather long and covers Combat Style mods—seasonal mods that offer powerful effects. If you aren't familiar with these mods, you'll want to read our guides on each Combat Style mechanic. We also have a guide on Armor 2.0 if you haven't played with Destiny 2's mod system yet. Each guide is linked below:
- A Complete Guide To Armor 2.0
- Combat Style Mods Explained
- Charged With Light Explained
- Warmind Cells Explained
- Elemental Wells Explained
Updated June 17th, 2022, by Charles Burgar: Dawnblade saw a rather major rework with Solar 3.0. After its launch and mid-season buffs, now is the time to delve into this subclass and create some amazing builds. We've replaced four of the builds in this guide, most of which use the recently-reworked Dawnblade subclass. Throw infinite grenades, benefit from multiple damage buffs in the Crucible, and more with these in-depth guides. Every guide has also received a makeover, now including images and an in-depth breakdown of that build's subclass specs and abilities. DIM links have been updated to account for refreshed Artifact mods.
PvP: Firing Squad
Why Play This Build?
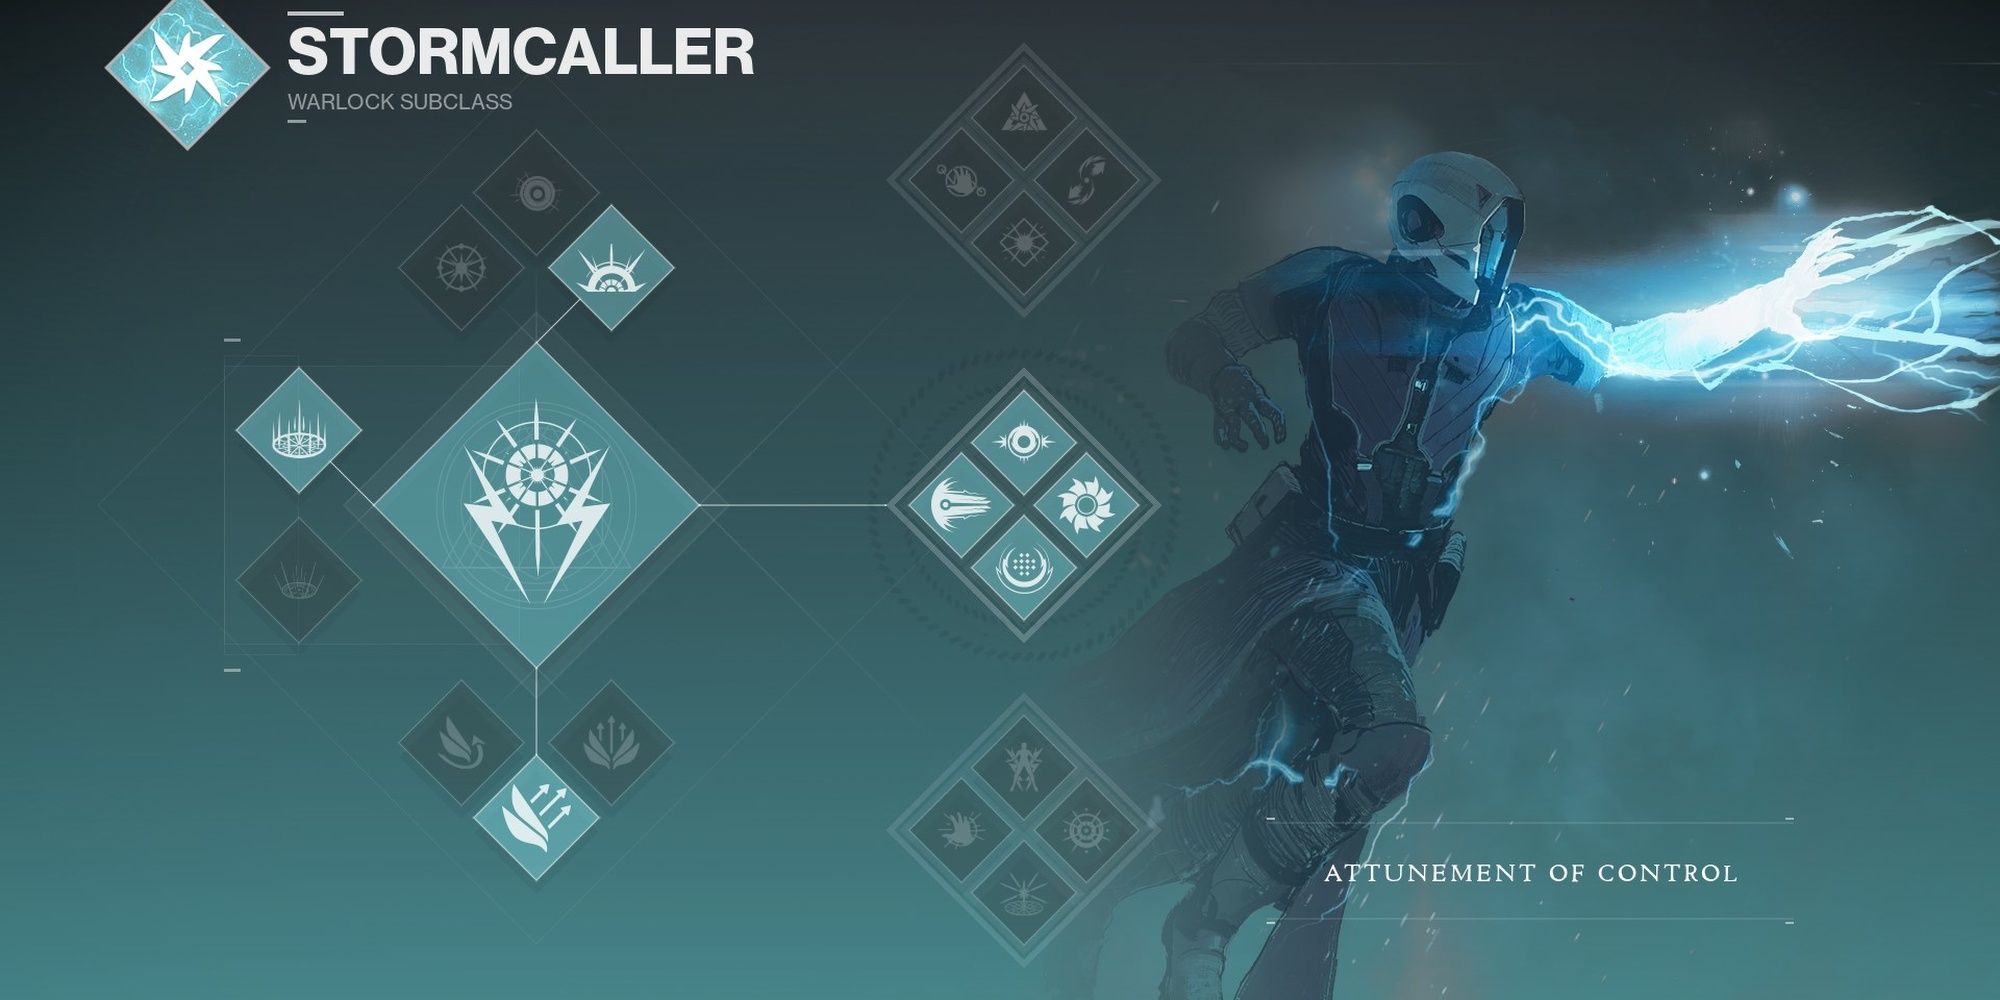
Are you tired of playing with teammates that can't aim? Say hello to No Time to Explain, an Exotic Pulse Rifle that creates a time portal that fires at enemies with incredible accuracy. With the Stormcaller subclass, you can also summon an Arc Soul or "Arc Buddy" to team-shot every enemy that dares approach you. Who needs teammates when you can make a weapons platform at will?
Time-to-kill values are extremely low when your portal and Arc Soul are active, and you have access to a fantastic Super in the form of Chaos Reach. If you hate PvP but need to complete 6v6 weeklies, give this build a try.
| Subclass | Attunement of Control (Middle Tree Stormcaller) |
|---|---|
| Exotic | Getaway Artist OR The Stag |
| Weapon | No Time to Explain |
Attunement of Control (Middle Tree Stormcaller) gives you access to a powerful ranged melee, Ionic Traces that grant ability energy for each kill, and one of the best PvP Supers in the form of Chaos Reach. Feel free to use Bottom Tree Stormcaller if you're using The Stag. Regardless of subclass, use Storm Grenades; they have the lowest cooldown of all three Stormcaller grenades.
Getaway Artist will be your Exotic armor piece, allowing you to consume your grenade in exchange for a Sentient Arc Soul for 20 seconds. This Arc Soul fires more projectiles more quickly and accurately than a standard Arc Soul. If you're playing Competitive PvP or Trials of Osiris, consider using The Stag instead.
No Time to Explain will be your weapon of choice. Masterwork it to increase the lethality of your time portal. Good backup weapons include Shotguns, Grenade Launchers, and any Legendary with Demolitionist.
| Subclass | |
|---|---|
| Tree | Middle Tree (Attunement of Control) |
| Grenade | Storm Grenade |
| Melee | Ball Lightning |
| Class Ability | Healing Rift |
Middle Tree Stormcaller has access to a great melee ability, constant ability regeneration with Ionic Traces, and Chaos Reach serves as a great shutdown Super. You can also use Bottom Tree Stormcaller if you're struggling to keep your Arc Soul active.
For your abilities, Storm Grenade is the play. This grenade has the shortest cooldown out of all three options and deals good damage. Healing Rift is great for giving you an edge in lane duels, and Ball Lightning is a great ranged melee ability for getting cleanups or lowering a target's HP.

| Mobility | Preference |
| Resilience | 50 |
| Recovery | 90+ |
| Discipline | 100 |
| Intellect | 40+ |
| Strength | Dump |
Discipline is your most important stat in this build, allowing you to recharge your grenade every 32 seconds with 100 Discipline. Combining this with Ionic Traces and Bomber, you can have a Sentient Arc Soul active for nearly every gunfight. Recovery is a good second stat to invest in.

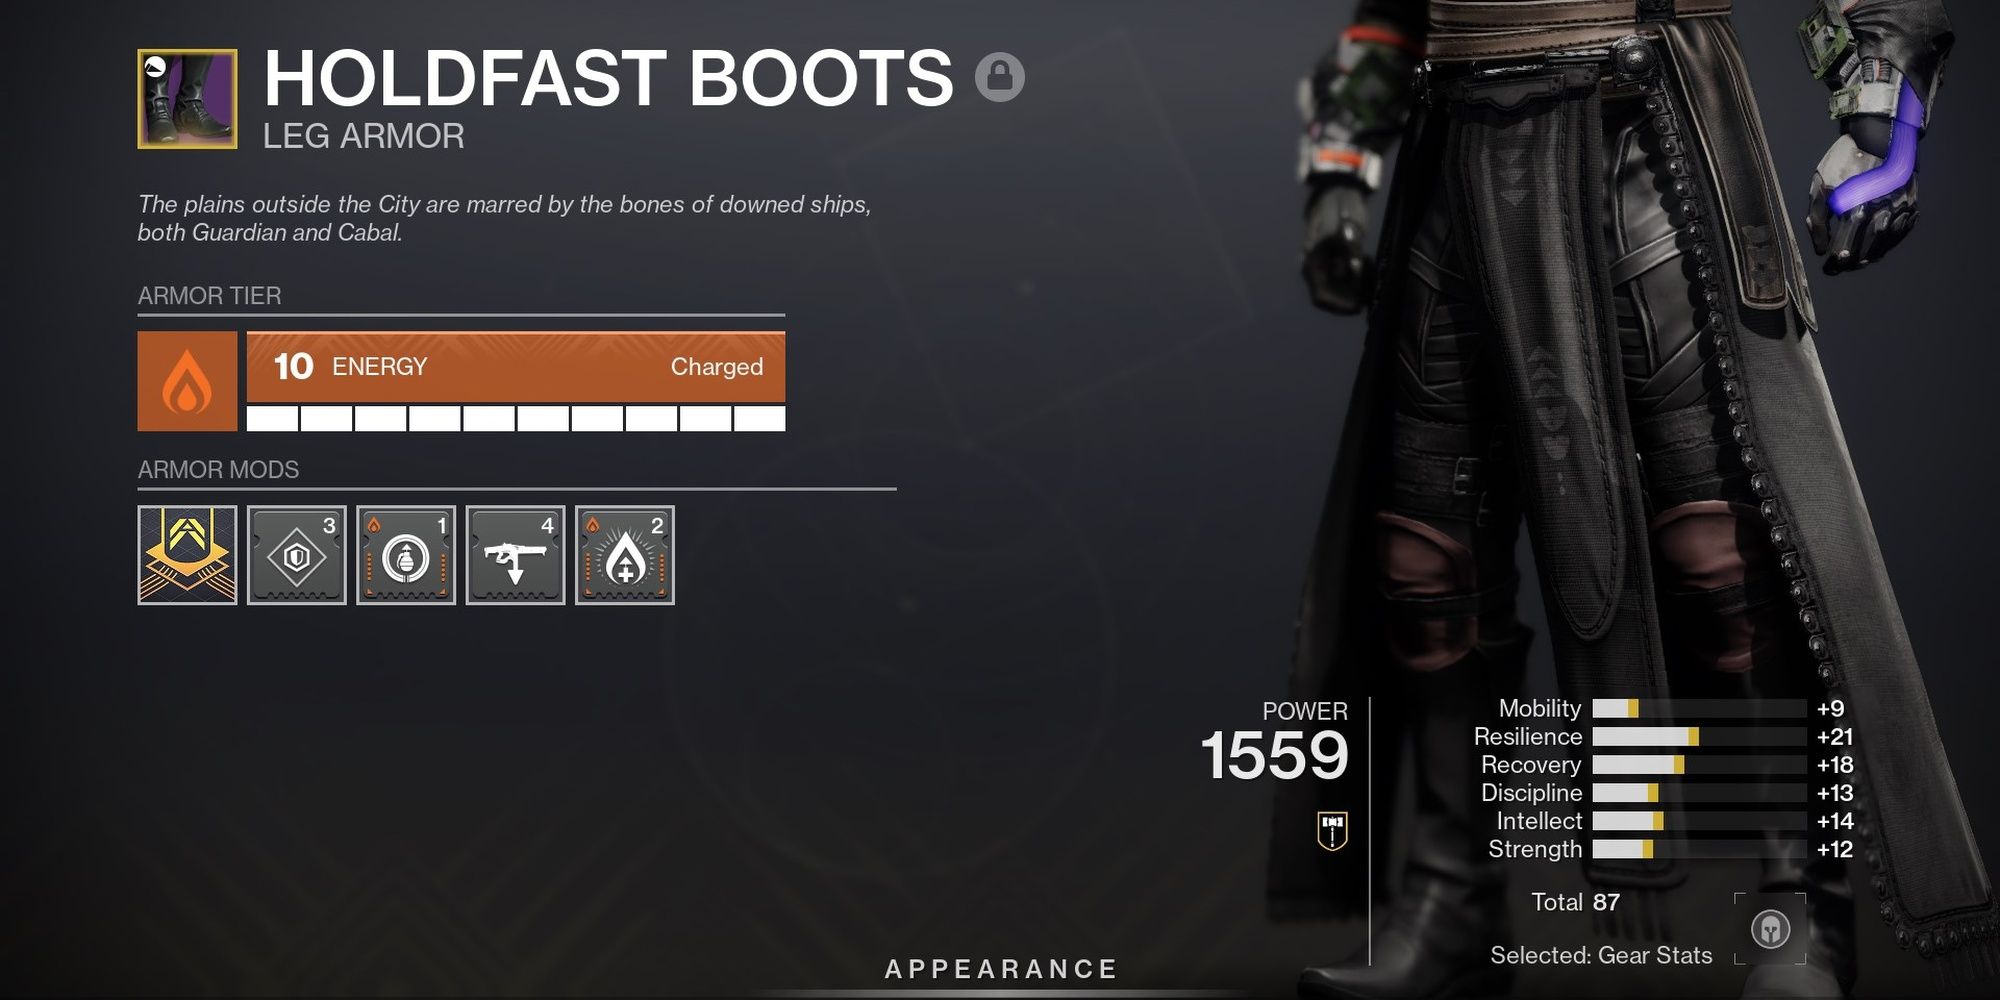
Armor(Element) | Mod Slots |
|---|---|
Helmet(Any) |
|
Gloves(Stasis) |
|
Robes(Any) |
|
Boots(Any) |
|
Bond(Solar) |
|
These mods focus on getting your grenade back as fast as possible. A single Grenade Kickstart will give you a solid chunk of energy once you create a Sentient Arc Soul, although we feel using two Grenade Kickstart mods doesn't provide enough of a benefit to warrant using eight energy on your armor. Supplement your grenade conversions with a Rift cast to take advantage of double Bomber, granting nearly half of your grenade back. Sentient Arc Soul kills don't count as grenade final blows, so don't bother with mods like Ashes to Assets.
| ARMOR MODS (COMBAT STYLE) |
|---|
| Helmet | Radiant Light |
| Gloves | None |
| Robes | Powerful Friends |
| Boots | Charge Harvester |
| Bond | High-Energy Fire |
Charge Harvester allows your Arc Soul and time portal a chance to give you a stack of Charged with Light, giving you a 20% damage buff. If you have it, Charge Harvester is also a great pick, as it lets your Arc Soul and NTTE portal generate Charged with Light stacks. Powerful Friends and Radiant Light are not required.
Return to Table of Contents
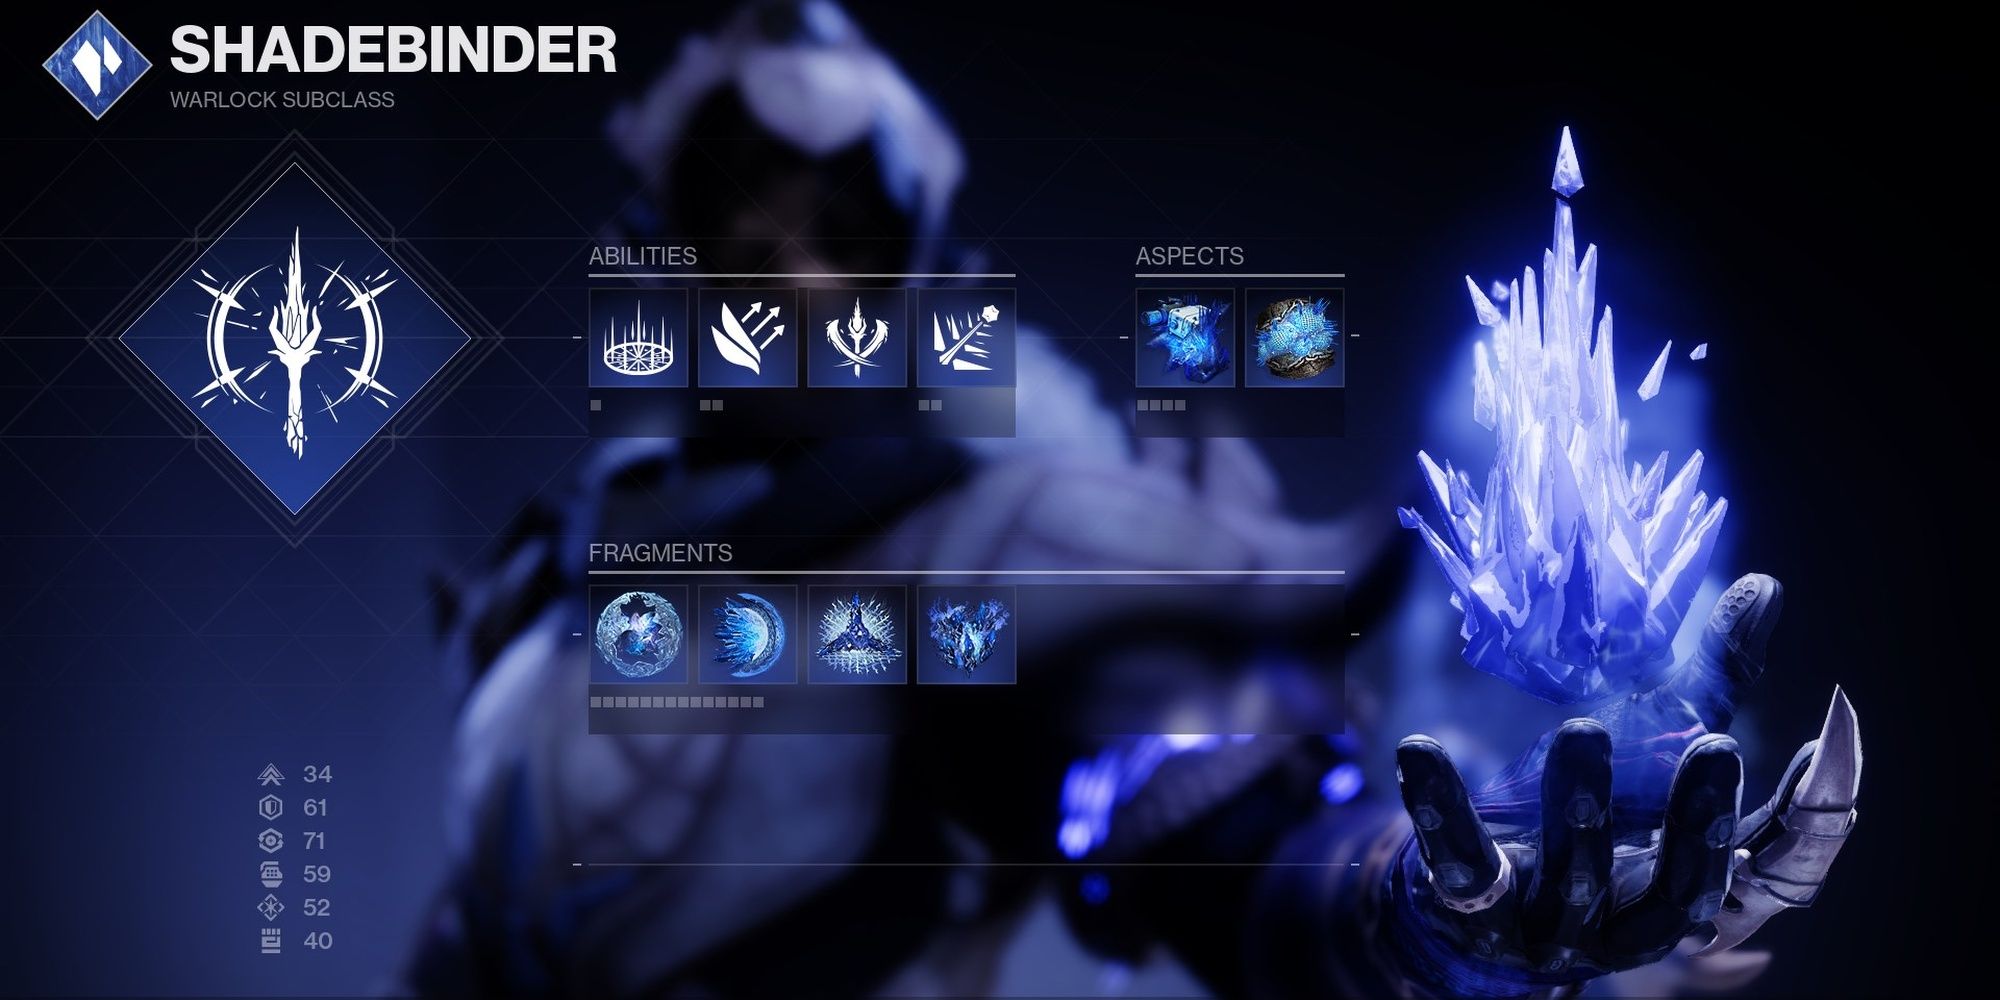
PvP: Umbral Shadebinder

Why Play This Build?
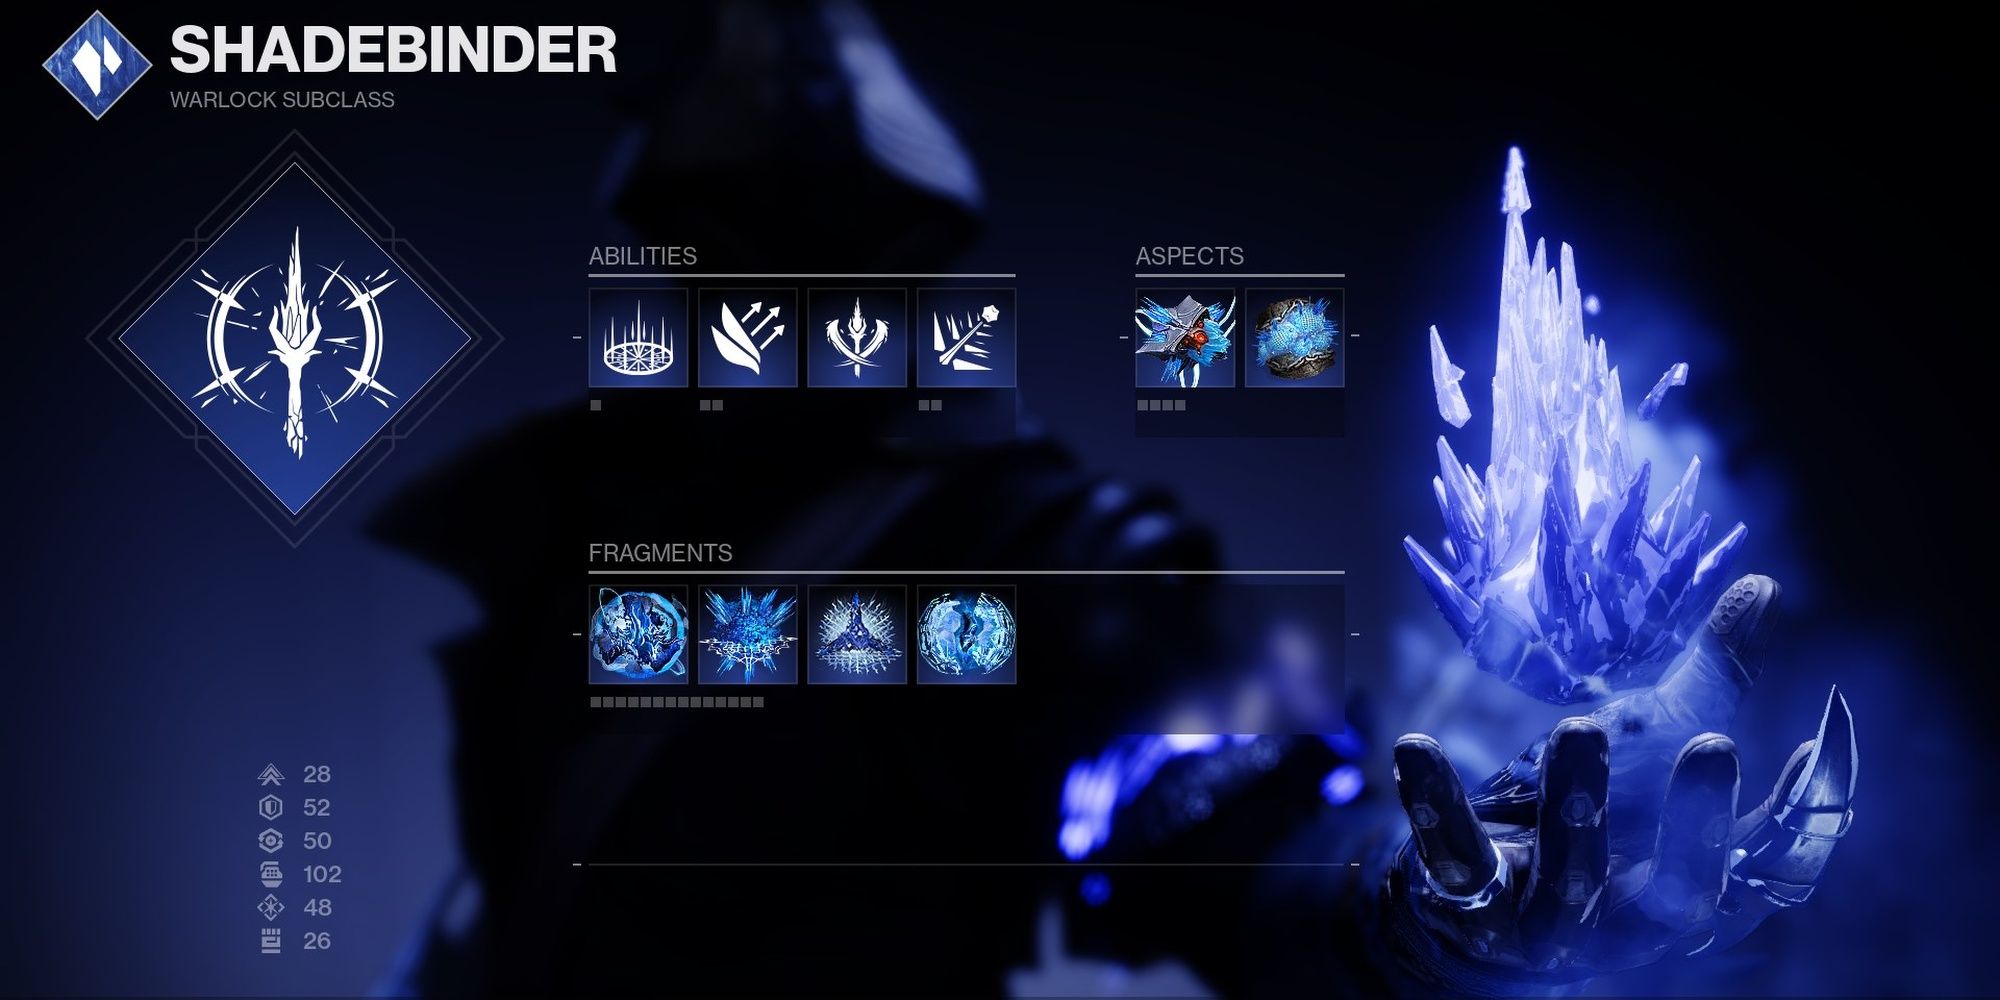
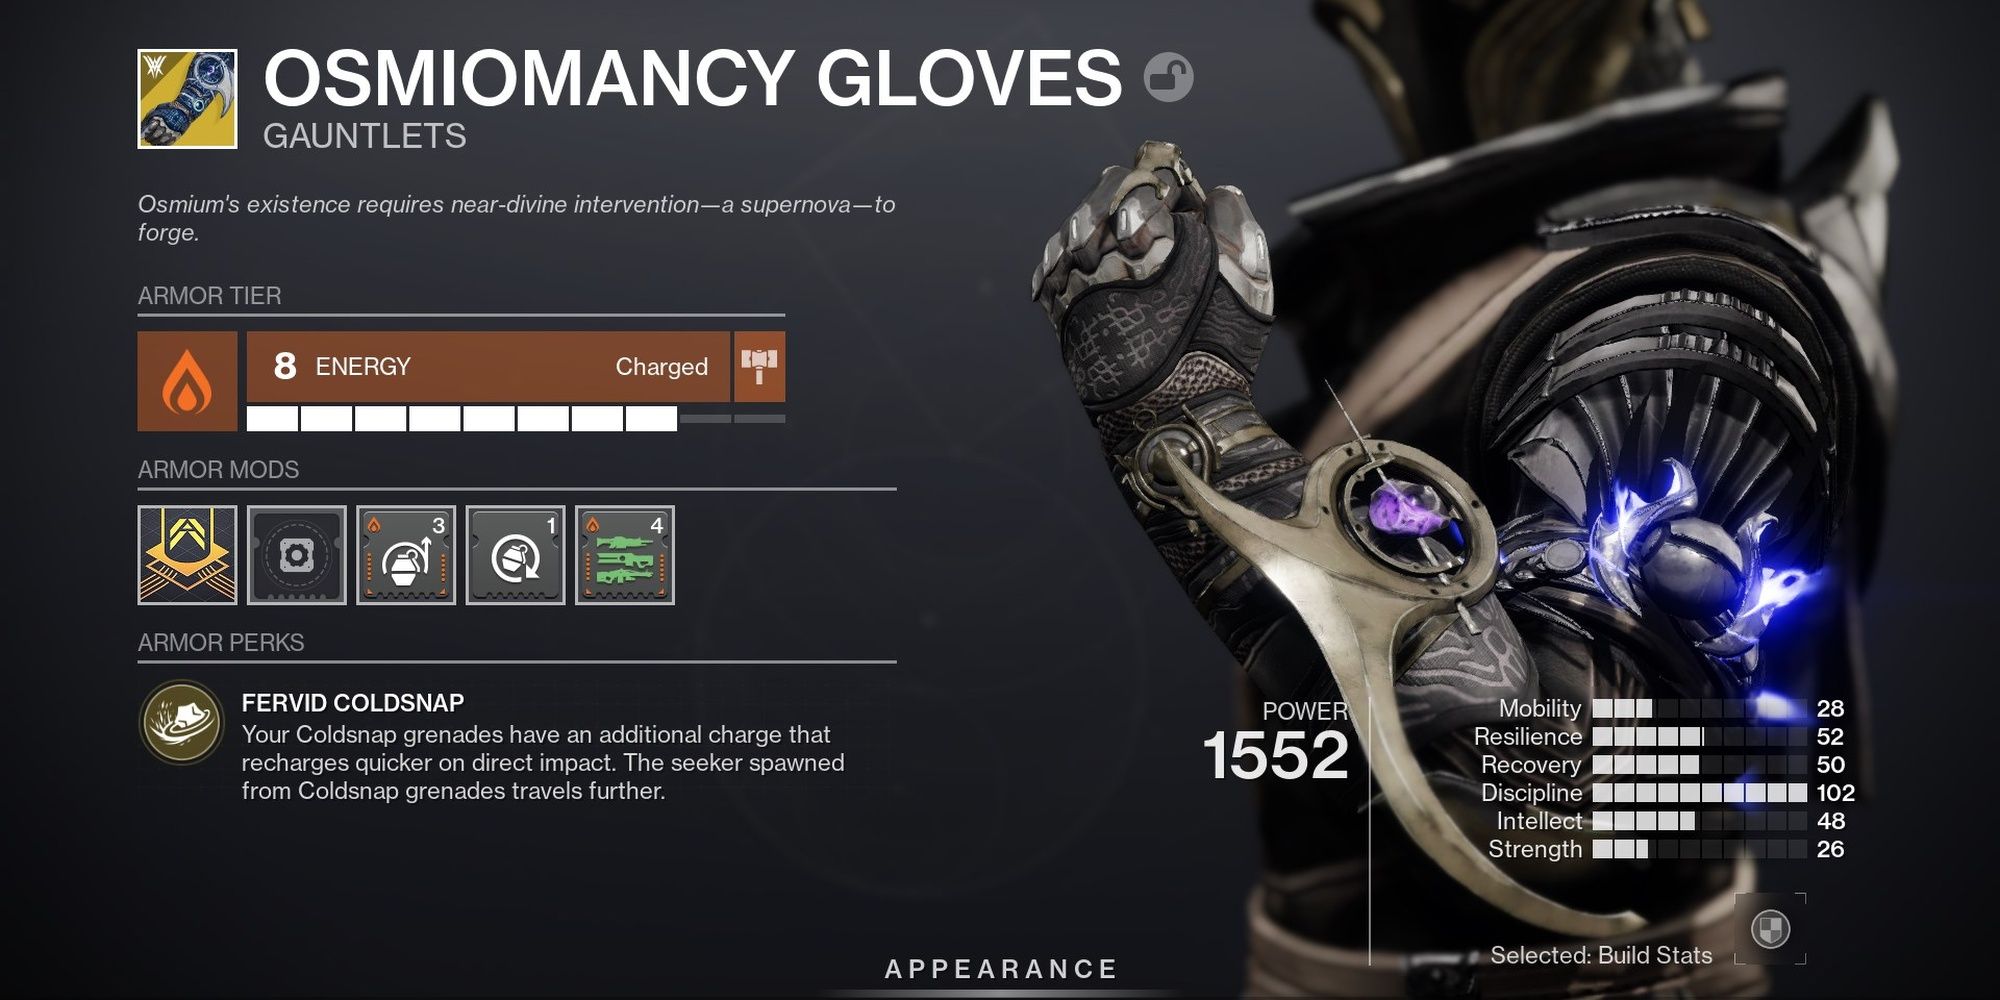
Shadebinders are incredibly strong in PvP, capable of stopping opponents in their tracks using their grenades, melee ability, and Super. This build enhances ability uptime by using Osmiomancy Gloves and numerous ability-enhancing armor mods. You'll have the ability to shutdown Supers, Shotgun rushers, and swing 1v1 gunfights in your favor with the power of Stasis freezes.
| Subclass | Shadebinder (Stasis) |
|---|---|
| Exotic | Osmiomancy Gloves OR Claws of Ahamkara |
| Weapon | Monte Carlo OR anything with Wellspring |
Shadebinder (Stasis) is what you'll be using. We'll cover the Aspects and Fragments in the next section.
Osmiomancy Gloves give you an absurd amount of ability energy back when you freeze a target with Coldsnap Grenades. Thanks to our subclass configuration and mods, you'll be able to freeze enemies to your heart's content. If you don't like Coldsnaps but still want to freeze enemies, consider using Claws of Ahamkara and speccing more into melee.
Monte Carlo is excellent here, giving you constant melee charges. 600 RPM Auto Rifles are still competitive in today's sandbox, so long as you can engage at medium distances. Beyond that, use weapons with Wellspring.
| Abilities | |
|---|---|
| Super | Winter's Wrath |
| Grenade | Coldsnap Grenade |
| Melee | Penumbral Blast |
| Class Ability | Healing Rift |
| Aspects | |
| Iceflare Bolts | Shattering a frozen target spawns seekers that track and freeze other nearby targets. |
| Glacial Harvest | Freezing targets creates Stasis shards around the frozen targets. Higher-tier combatants create more shards. |
| Fragments | |
| Rime | Collecting a Stasis shard grants a small amount of overshield, which falls off after 10 seconds. Collecting additional shards adds to the overshield and refreshes the timer. |
| Hedrons | Freezing a target grants +30 Mobility, Resilience, Recovery, better weapon Stability and aim assist, and +20 Airborne Effectiveness for 12 seconds. -10 Strength |
| Hunger | Increases the melee energy gained from picking up Stasis shards. -10 Mobility and Recovery |
| Rending | Kinetic weapons deal more damage against Stasis crystals and frozen targets. |
This build uses Coldsnap Grenades, Penumbral Blast, and Healing Rift to give you a leg up in most situations. Freezing targets will generate Stasis Shards, so Coldsnap Grenade is a no-brainer here. Penumbral Blast will have better uptime, and freezing targets with help with recovering your HP.
Aspects focus on improving your freezes. Glacial Harvest is phenomenal for improving your melee uptime, generating Stasis Shards on occasion when you freeze a target. We pair this with Iceflare Bolts to freeze even more enemies. The freeze proliferation from Iceflare Bolts might not generate additional Stasis Shards, yet the added crowd control is nothing short of devastating in PvP.
Fragments on this build focus on enhancing the power of Stasis Shards and freezes. Whisper of Rime allows your Stasis Shards to heal you and even grant an overshield. Whisper of Hunger imposes a large stat penalty, but it doubles the melee returns of picking up shards. Whisper of Rending makes it much easier to kill a frozen enemy, and Whisper of Hedrons gives so many buffs that it's tough to replace. Feel free to replace Whisper of Hunger with Whisper of Torment.

| Mobility | Dump |
| Resilience | 50 |
| Recovery | 90+ |
| Discipline | 100 |
| Intellect | 40+ |
| Strength | 30+ |
Discipline will help recharge your Coldsnap Grenades faster when they're on cooldown. Beyond that, spec for Recovery to get your Rifts back faster.
Armor(Element) | Mod Slots |
|---|---|
Helmet(Any) |
|
Gloves(Solar) |
|
Robes(Any) |
|
Boots(Any) |
|
Bond(Solar) |
|
These mods focus on generating your abilities as fast as possible. Get in the habit of casting your Rift to get the most out of Bomber.
| ARMOR MODS (COMBAT STYLE) |
|---|
| Helmet | Sustained Charge |
| Gloves | Sustained Charge |
| Robes | Powerful Friends |
| Boots | High-Energy Fire |
| Bond | Radiant Light |
This is a fairly basic Charged with Light setup, replacing Taking Charge and a utility effect with two Sustained Charges. This allows Monte Carlo, Auto Rifles, and Trace Rifles the ability to give you Charged with Light stacks. Powerful Friends and Radiant Light aren't required but are extremely helpful.
Return to Table of Contents
PvP: Devouring Rift
Why Play This Build?
Void 3.0 removed the Warlock's ability to consume their grenade to gain Devour. That's a rather major loss in the eyes of many, yet there's a way to bring back that functionality: Secant Filaments. These boots turn your Empowering Rift into a "Devouring Rift," granting you Devour when cast and Overload Rounds while inside the Rift.
This build focuses on short ability cooldowns to ensure that you have constant Rifts and grenades. You'll be able to play aggressively, throw grenades quite often, two-tap enemies while standing in your Rift, and you'll get to benefit from some of the Voidwalker's best Aspects and Fragments.
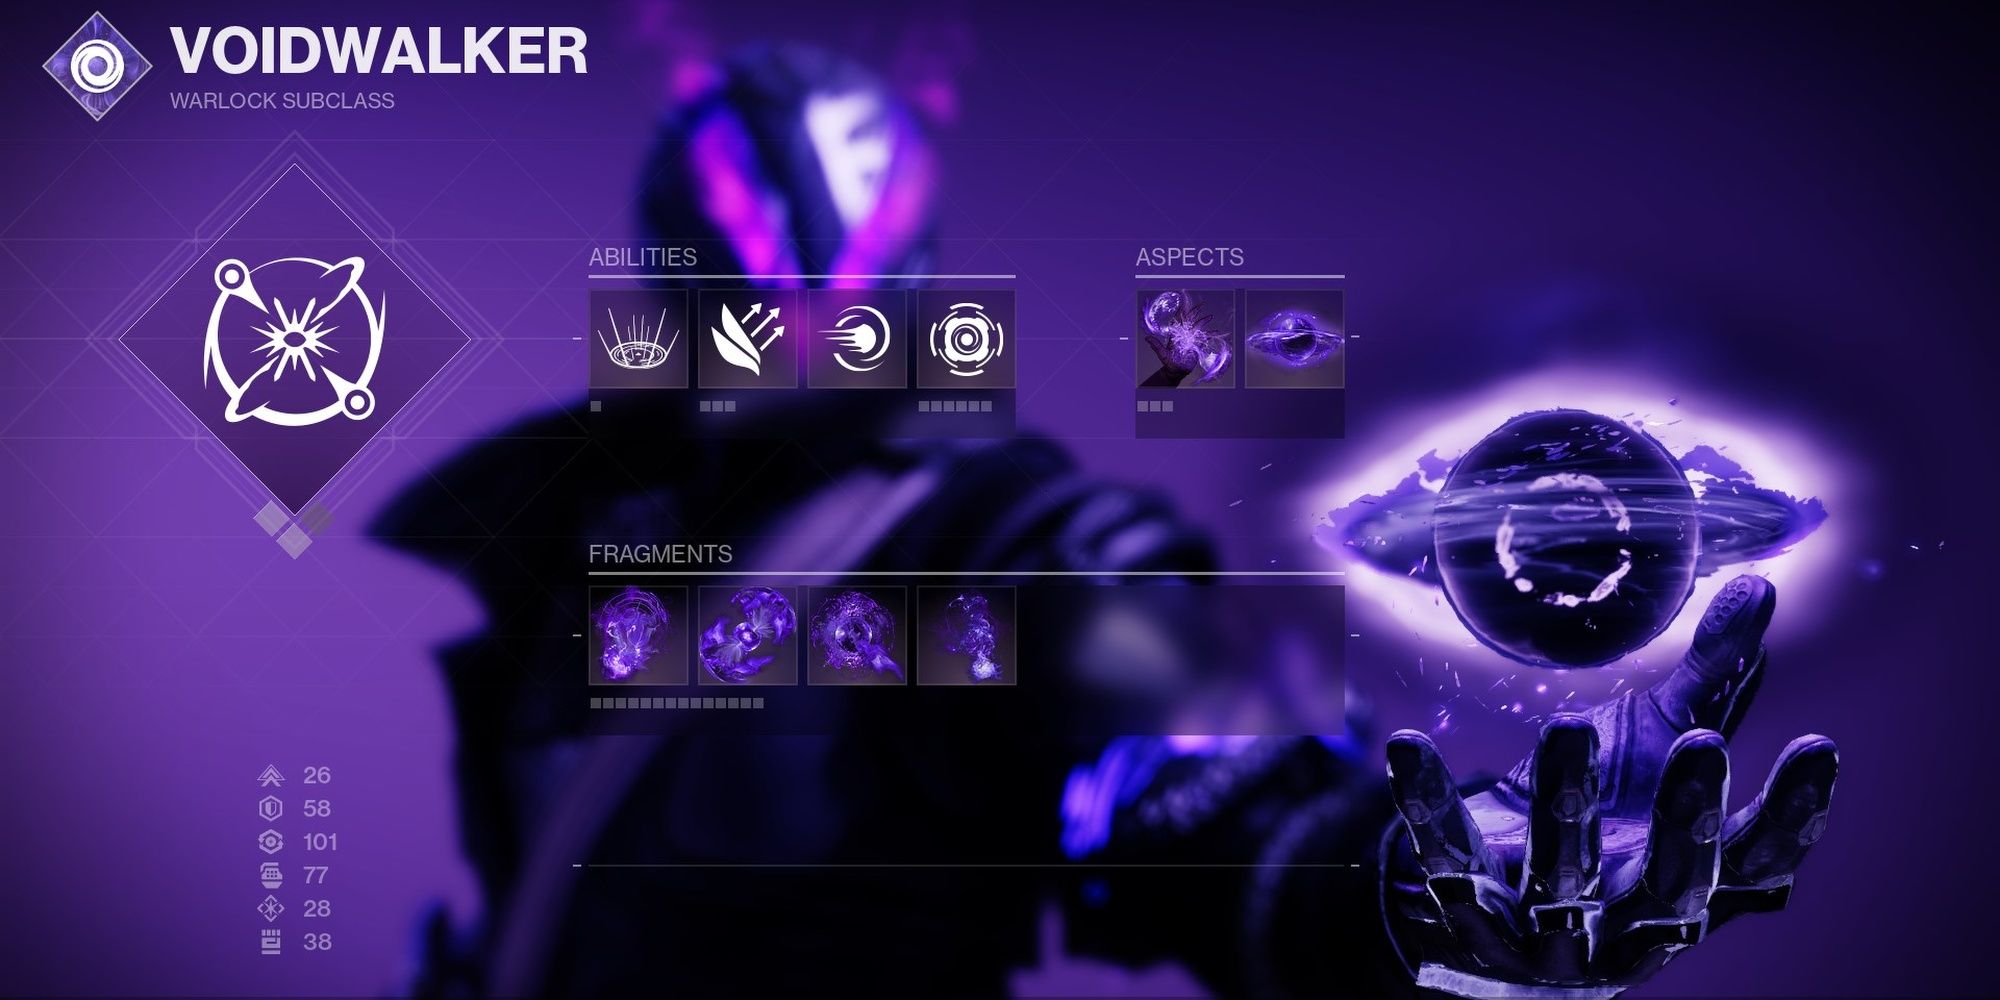
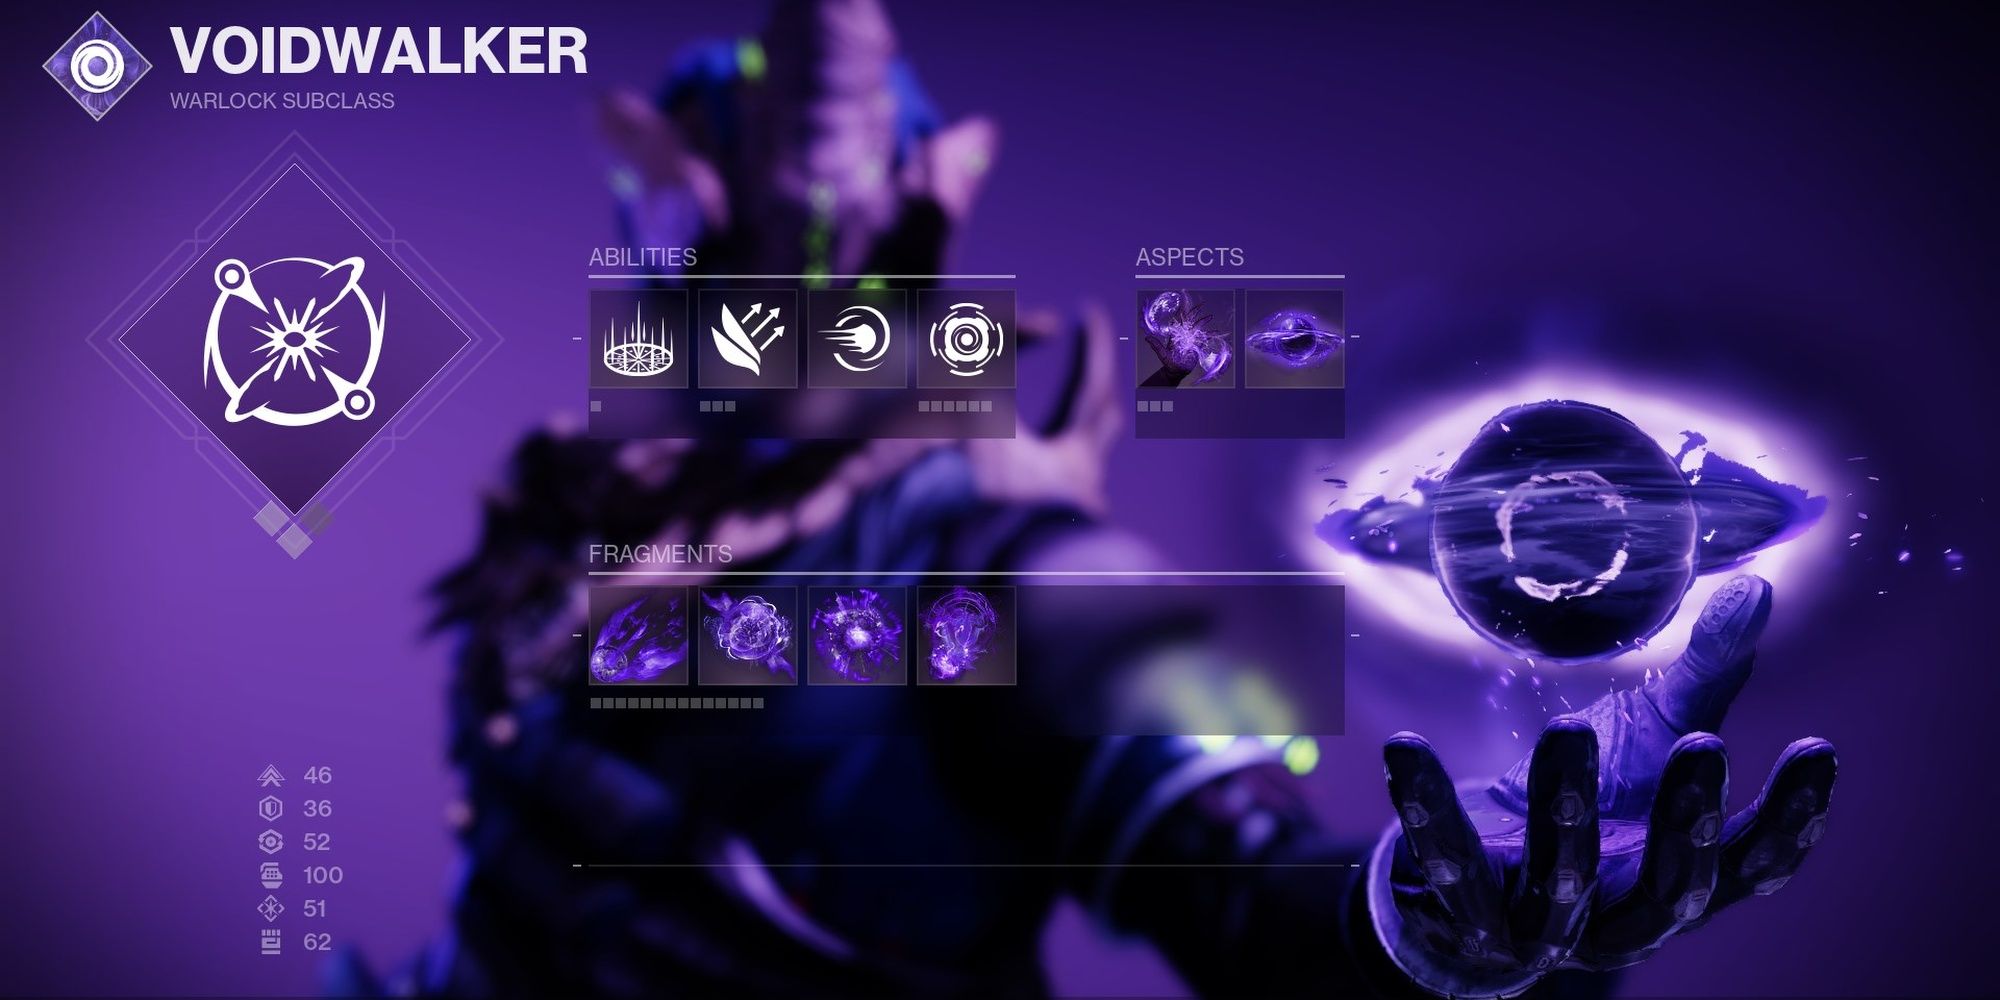
| Subclass | Voidwalker (Void) |
|---|---|
| Exotic | Secant Filaments |
| Weapon | Any |
Voidwalker (Void) will be your subclass. Warlocks saw some incredible additions with Void 3.0, most of which we'll cover in the Subclass Configuration section. But for now, just know that we'll be giving your Rift and abilities some additional benefits.
Secant Filaments fills a hole left with the conversion from Void 2.0 to 3.0. This Exotic allows you to proc Devour when needed, fully healing you upon casting your Empowering Rift. You also gain Overload Rounds while inside the Rift, which actually reduces your opponent's ability cooldown speeds ever so slightly.
Use any weapons you like. If you want some suggestions, Traveler's Chosen and weapons with Wellspring are fantastic for this build.
| Abilities | |
|---|---|
| Super | Nova Bomb: Cataclysm |
| Grenade | Magnetic Grenade |
| Melee | Pocket Singularity |
| Class Ability | Empowering Rift |
| Aspects | |
| Child Of The Old Gods | Spawn a Void Soul upon casting your Rift. Damaging a target will launch the Void Soul to their location, weakening them while dealing damage. Void Soul restores HP while dealing damage. |
| Feed The Void | Ability kills grant Devour. |
| Fragments | |
| Persistence | Extends the duration of Void buffs, including Devour. -10 Recovery |
| Starvation | Picking up and Orb of Power grants Devour. -10 Recovery |
| Harvest | Defeating weakened targets with precision final blows will create an Orb of Power. -10 Intellect |
| Obscurity | Finishers make you invisible. +10 Recovery |
This build uses Magnetic Grenades, the Cataclysm variant of Nova Bomb, and Empowering Rift. Magnetic Grenades are incredibly consistent and leave enemies one-shot if they stick. Empowering Rift is needed for Secant Filaments to work, and Nova Bomb: Cataclysm is a solid Super for all situations.
Aspects are focused on giving you Fragment slots. Child of the Old Gods is active quite often with how frequently you'll be casting your Rift, giving you a means of weakening targets while refunding class ability energy. Feed the Void is used solely for the Fragment slots, although getting Devour on any ability kill is quite useful.
Fragments focus on Devour uptime. Echo of Persistence makes your Devour last up to 15 seconds, even longer from Secants. Harvest and Starvation seem odd at first glance, but these Fragments give you another means of proccing Devour. Child of the Old Gods weakens targets, making it easy to land a precision kill to spawn an Orb. Grab that Orb, and you'll heal most of your HP and gain Devour. To help counteract the -20 Recovery penalty, we're using Echo of Obscurity; we're just using it for the Recovery since Finishers are disabled in the Crucible.

| Mobility | Dump |
| Resilience | 50 or dump |
| Recovery | 100 |
| Discipline | 50+ |
| Intellect | 40 |
| Strength | Dump |
Recovery is mandatory for this build. Max Recovery means you can cast your Rift more often, meaning more Child of the Old God casts and Devour uptime. Beyond that, focus on Discipline to throw even more grenades each match. The rest of your stats don't matter as much, so feel free to dump them.
Armor(Element) | Mod Slots |
|---|---|
Helmet(Any) |
|
Gloves(Void) |
|
Robes(Any) |
|
Boots(Any) |
|
Bond(Stasis) |
|
Be sure to equip a Siphon mod to spawn Orbs of Power on double kills. Beyond that, equip two Bolstering Detonation mods on your gloves to gain a massive chunk of Rift energy when your Magnetic Grenade hits someone. Insulation is also a good mod for this build, granting Rift energy whenever you grab an Orb of Power. We also use two Utility Kickstart mods to further reduce the cooldown of Empowering Rift. You'll be getting so much Rift energy that you can take serious advantage of Devour and Child of the Old Gods.
| ARMOR MODS (COMBAT STYLE) |
|---|
| Helmet | Taking Charge |
| Gloves | Preference |
| Robes | Powerful Friends |
| Boots | Radiant Light |
| Bond | High-Energy Fire |
While simple, this Charged with Light setup is too good to not use. Taking Charge gets some serious mileage since you have two ways of spawning Orbs of Power, each granting Devour and a 20% damage buff for yourself and nearby allies. For the boot slot, you can leave that blank or use whichever mod sounds good to you. Powerful Friends and Radiant Light are not required but highly recommended.
Return to Table of Contents
PvP: Echo Of Magnetism

Why Play This Build?
Abilities in Destiny 2's Crucible rarely one-shot and focus more on weakening targets than outright killing them. Not this build. Thanks to Verity's Brow and a few Fragments, it's possible to turn your Void grenades into one-shot killing machines that activate Devour and Volatile Rounds, making you the ultimate slayer in 6v6 modes. If you want to crank up the lethality of Void 3.0 to 11, this is the build for you.
| Subclass | Voidwalker (Void) |
|---|---|
| Exotic | Verity's Brow |
| Weapon | Any Void weapon |
Voidwalker (Void) is one of the best subclasses for a grenade-focused build, especially for PvP. With the right Aspects and Fragments, you can throw one-shot grenades quite consistently.
Verity's Brow increases your grenade recharge rate when you get weapon kills that match your subclass. This also buffs your grenade damage. At x1 Death Throes stacks, your grenades will one-shot Guardians.
Any Void weapon will work with this build. Some good weapons include Funnelweb, Graviton Lance, Gnawing Hunger, and Snorri FR5. Void weapons with Demolitionist are especially useful.
| Abilities | |
|---|---|
| Super | Nova Bomb: Cataclysm |
| Grenade | Magnetic Grenade |
| Melee | Pocket Singularity |
| Class Ability | Healing Rift |
| Aspects | |
| Child Of The Old Gods | Spawn a Void Soul upon casting your Rift. Damaging a target will launch the Void Soul to their location, weakening them while dealing damage. Void Soul restores ability energy while dealing damage. |
| Feed The Void | Ability kills grant Devour. |
| Fragments | |
| Persistence | Extends the duration of Void buffs, including Devour. -10 Recovery |
| Undermining | Your Void grenades weaken targets. -20 Discipline |
| Instability | Defeating targets with grenades grants Volatile Rounds to your Void weapons. +10 Strength |
| Expulsion | Void ability final blows cause targets to explode. +10 Intellect |
This build uses Magnetic Grenades, the Cataclysm variant of Nova Bomb, and Healing Rift. Magnetic Grenades are the star of the show. Get a kill with a Void weapon, throw your grenade, and the target will drop dead. Keep getting kills and use Child of the Old Gods to refuel your grenade energy, repeating the process. The Super is up to you. We recommend Nova Bomb: Cataclysm since it recharges quickly, but feel free to use Nova Warp instead.
Aspects for this build include Child of the Old Gods and Feed the Void. Child of the Old Gods grants energy for every ability when it's active, and Feed the Void allows you to proc Devour with each grenade kill.
Fragments further buff this build's lethality and buff uptime. Persistence makes Devour last longer. Undermining is mandatory and lets your grenades one-shot with Verity's Brow. Instability gives you Volatile Rounds after a grenade kill, making future kills a little easier. Finally, Expulsion is nice for dealing with groups that teamshot.

| Mobility | Preference |
| Resilience | Dump |
| Recovery | 60+ |
| Discipline | 100 |
| Intellect | 40 |
| Strength | Dump |
Discipline needs to be at 100 for this build to work effectively. Beyond that, focus on increasing your Recovery. The rest of your stats don't matter.
Armor(Element) | Mod Slots |
|---|---|
Helmet(Solar) |
|
Gloves(Any) |
|
Robes(Any) |
|
Boots(Any) |
|
Bond(Void) |
|
Ashes to Assets is fantastic for this build, giving you Super energy with each grenade kill. Fastball makes Magnetic Grenades easier to land, and double Bombers make your grenade come back a little bit faster. The rest of the mods you use are down to preference.
| ARMOR MODS (COMBAT STYLE) |
|---|
| Helmet | None |
| Gloves | High-Energy Fire |
| Robes | Powerful Friends |
| Boots | Radiant Light |
| Bond | Taking Charge |
Powerful Friends and Radiant Light give everyone near you x1 Charged with Light—including yourself if an ally has Powerful Friends. High-Energy Fire gives a 15% damage buff while you're Charged with Light. These mods are mostly used for their stat bonuses and aren't mandatory.
Return to Table of Contents
PvP: Mending Embers
Why Play This Build?
This build combines the excellent movement capabilities of Dawnblade and pairs them with the Rain of Fire Exotic. Dashing around the battlefield will reload all of your weapons, and every Fusion Rifle kill will give you a damage buff. Paired with Vex Mythoclast, Rain of Fire's Radiant buff is almost always active.
Thanks to Solar 3.0 buffs partway through this season, you also have amazing healing capabilities with this build. Throw a grenade at your feet to gain a constant healing effect. Consume your grenade to heal yourself and nearby allies, granting a ton of Airborne Effectiveness in the process. Use your melee to give allies the Radiant buff, and slay out to gain up to three damage buffs at once. Excellent movement, multiple healing methods, and constant damage buffs make this one of the best PvP builds you can use in the current sandbox.
Can You Make This A Support Build?
You absolutely can with minimal changes. Swap Rain of Fire with Boots of the Assembler, and use Lumina instead of Vex Mythoclast to give your team constant healing or empowering orbs. With that said, we find this variant to be quite slow and highly dependent on how good your team is. Try this out in Trials or Comp in a premade squad. For casual PvP or Freelance, the various buffs from Rain of Fire are too good to pass up.
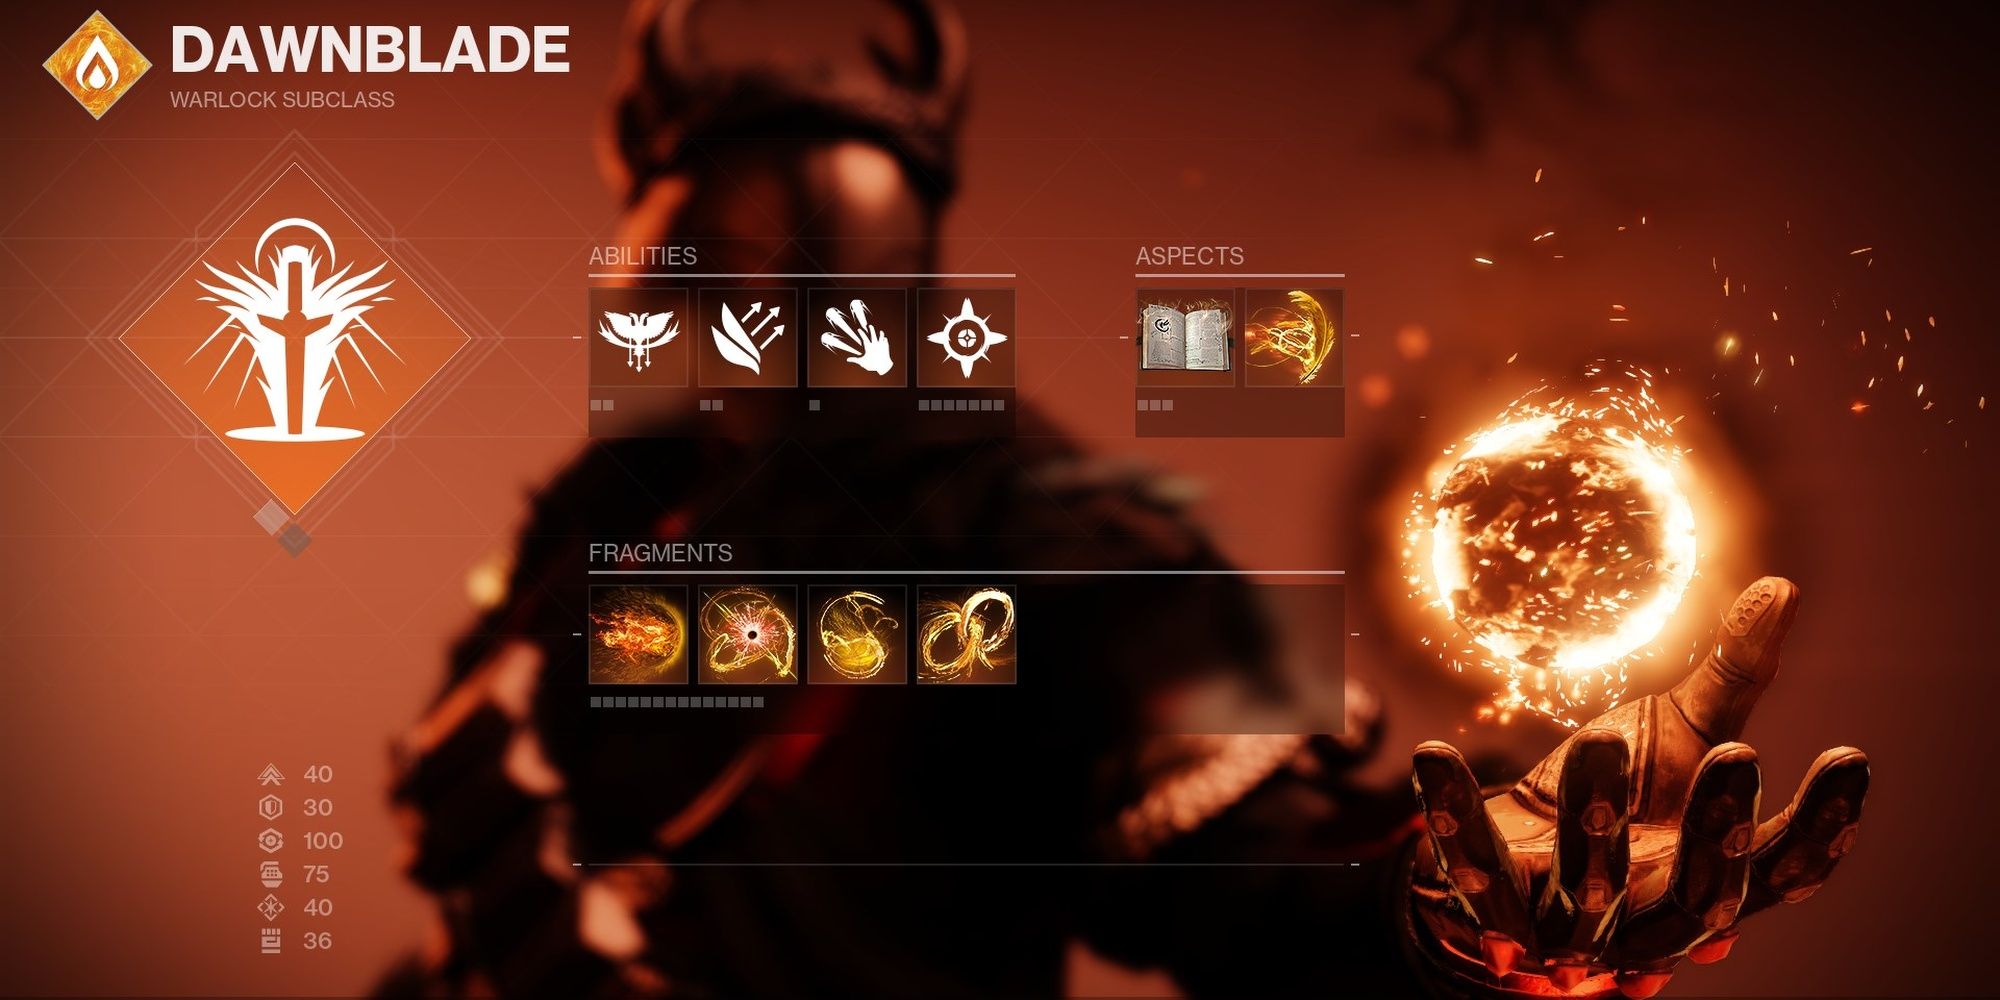
| Subclass | Dawnblade (Solar) |
|---|---|
| Exotic | Rain Of Fire |
| Weapon | Vex Mythoclast |
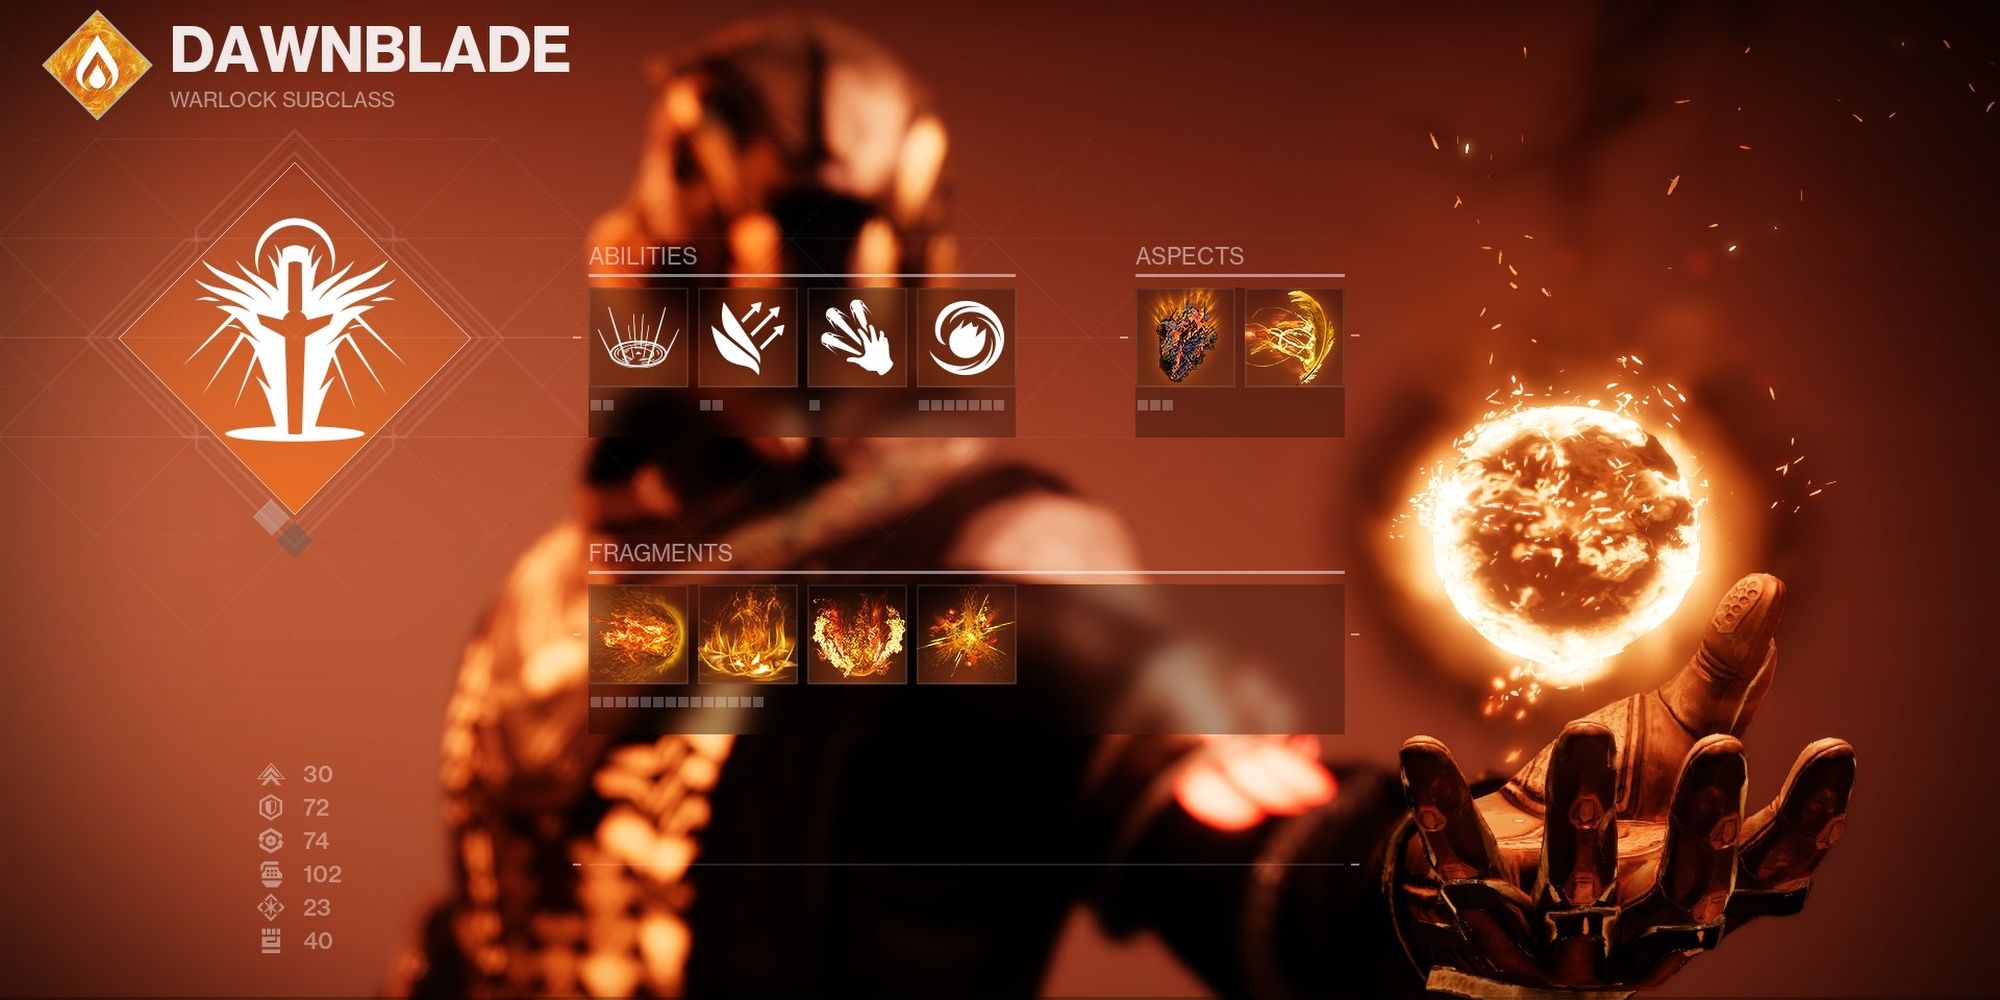
Dawnblade (Solar) is a fantastic PvP spec for all Crucible modes. You have ample sources of healing (called Cure in-game), multiple movement tools, and you have two great melee abilities to choose from.
Rain of Fire turns Icarus Dash into a four-second Marksman's Dodge you can use in the air. Whenever you dash, you'll reload all of your weapons—both holstered and equipped. Killing an enemy with a Fusion Rifle will grant the Radiant buff for a slightly shorter duration than you'd expect, and all Fusion Rifles gain +30 Airborne Effectiveness.
Vex Mythoclast is a no-brainer here, benefiting from Rain of Fire's Airborne Effectiveness passive and Radiant perk. One kill will trigger Vex's Catalyst and Rain of Fire's Radiant buff. Get a second kill shortly thereafter, and you'll activate High-Energy Fire. The synergy between this gun and Rain of Fire is nothing short of phenomenal.
| Abilities | |
|---|---|
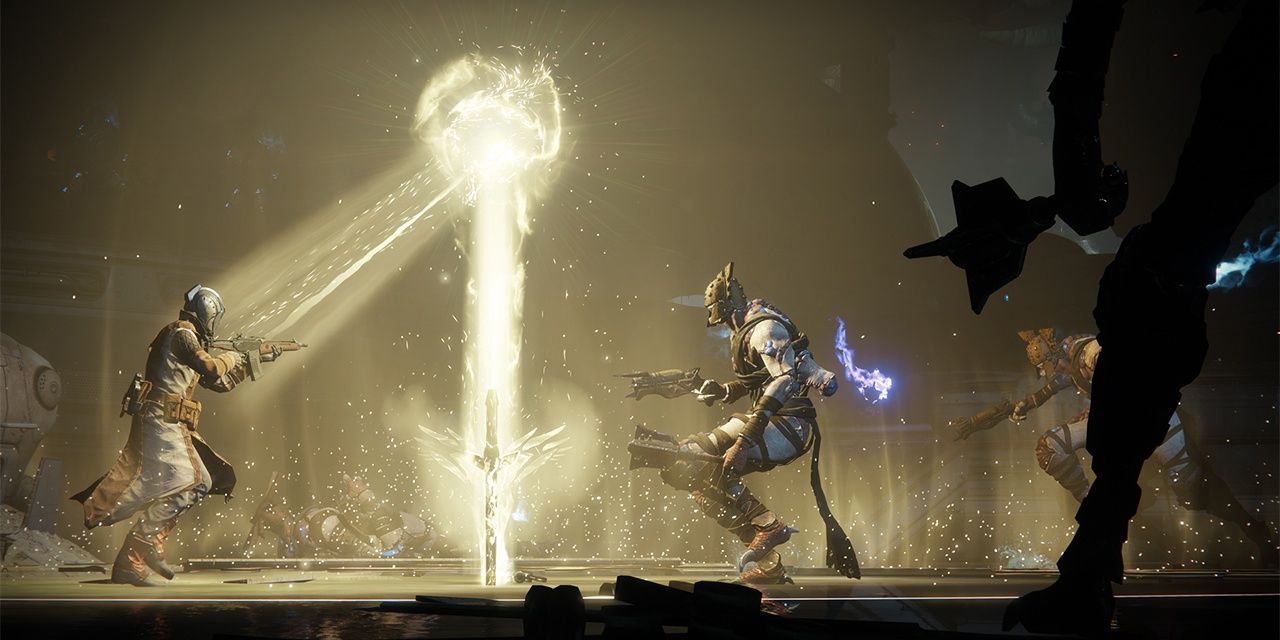
| Super | Well of Radiance |
| Grenade | Healing Grenade |
| Melee | Celestial Fire |
| Class Ability | Phoenix Dive OR Healing Rift |
| Aspects | |
| Heat Rises | You may shoot and use abilities while gliding. You may consume your grenade to gain the Heat Rises buff for 15 seconds while inflicting Cure to yourself and nearby allies. Heat Rises gives +70 Airborne Effectiveness. Airborne kills grant melee energy. |
| Icarus Dash | You may dash midair once every four seconds. With Heat Rises active, you can dash twice every four seconds. Midair multikills and Super final blows grant Cure to yourself. |
| Fragments | |
| Torches | Powered melee hits grant Radiant to yourself and nearby allies. |
| Solace | Radiant and Restoration effects last longer. |
| Singeing | Your class ability recharges faster when you Scorch targets. |
| Benevolence | Buffing allies with Cure, Radiant, or Restoration increases all ability cooldowns for a short time. -10 Discipline |
This build uses Healing Grenades, Celestial Fire, Phoenix Dive, and the Well of Radiance Super. Healing Grenades are fantastic in just about every situation. Throw the grenade at your feet to get a long duration, uninterruptible heal, or you can consume the grenade to gain a massive heal. Celestial Fire inflicts Scorch despite its description, so this melee will trigger Ember of Singeing. With Heat Rising, Phoenix Dive can Scorch nearby targets and Cure allies, proccing both Singeing and Benevolence to drastically reduce its cooldown. If you don't like Phoenix Dive, Healing Rift works just as well.
Aspects focus on improving your movement. Heat Rises is arguably the most complicated Aspect in Destiny 2, but it effectively lets you consume your grenade to heal nearby allies while giving you a ton of Airborne Effectiveness. Icarus Dash gives you a midair dash every four seconds that can help propel the momentum of Burst Glide, giving you a ton of horizontal mobility. Paired with Heat Rises, you can dominate the skies and traverse most PvP maps faster than any other build in the game.
Fragments help with enhancing your buffs and ability cooldowns. Torches gives you a reliable way to gain Radiant without needing to kill someone. Singeing helps you get your class ability back much faster, allowing you to cast Rifts or Phoenix Dive more often. Solace makes your buffs last longer, and Benevolence is constantly activating since every ability can buff your allies.

| Mobility | Preference |
| Resilience | 50 |
| Recovery | 100 |
| Discipline | 80+ |
| Intellect | 40 |
| Strength | 40+ |
Recovery is the most important PvP stat, especially for Warlocks. Get this to 100, then focus on increasing your Discipline. The rest of your stats are down to preference.
Armor(Element) | Mod Slots |
|---|---|
Helmet(Any) |
|
Gloves(Any) |
|
Robes(Any) |
|
Boots(Any) |
|
Bond(Stasis) |
|
Fusion Rifle mods are highly recommended since it synergizes with our Exotics. Beyond that, use Utility Kickstart and this season's Classy Restoration mod. This will let you use your class ability more often, each cast granting the Restoration buff for a few seconds.
| ARMOR MODS (COMBAT STYLE) |
|---|
| Helmet | Radiant Light |
| Gloves | High-Energy Fire |
| Robes | Powerful Friends |
| Boots | Quick Charge |
| Bond | None |
Quick Charge will grant a stack of Charged with Light every time you land a double kill, buffing your damage output by 15% until you kill someone. Paired with Radiant and Vex's Catalyst, you'll be dishing out some absurd damage in all Crucible game types. If you're playing 6v6 modes, consider replacing Powerful Friends with a Void chest and the Stacks on Stacks mod.
Return to Table of Contents

PvE: Warlord's Spark

Why Play This Build?
Just about every problem in Destiny 2 can be answered with a well-timed snap of your fingers. The Incinerator Snap melee is one of the strongest melee abilities that Warlocks have, and it can be buffed to an absurd degree with the Winter's Guile Exotic gloves.
By landing melee kills, you'll increase the strength of each Incinerator Snap and that melee's Scorch and Ignite procs. Get enough kills, and one snap is enough to kill most majors and even Champions. Shower your screen in explosions, Elemental Wells, and become nigh-invincible with this unorthodox Solar 3.0 build.
| Subclass | Dawnblade (Solar) |
|---|---|
| Exotic | Winter's Guile |
| Weapon | Dead Messenger |
Dawnblade (Solar) has access to ample sources of Cure, Restoration, and can even get Radiant through Ember of Torches. With this build's reliance on melee and Solar weapon kills, you'll have permanent Restoration and Radiant active.
Winter's Guile gives a five-second damage buff after you land a melee kill. This buff stacks up to five times, granting up to 650% more melee damage at maximum stacks. This damage buff affects the raw damage and Ignitions caused by Incinerator Snap.
Dead Messenger seems strange at first, but this weapon covers all shield types and has absurd synergy with Elemental Wells. With this season's Flame Harvesting mod, double kills spawn an Elemental Well. You can pair this with Bountiful Wells to spawn two Elemental Wells with each double kill. Add on Explosive Wellmaker, and now it's spawning four Wells per double kill.
| Abilities | |
|---|---|
| Super | Well of Radiance |
| Grenade | Healing Grenade |
| Melee | Celestial Fire |
| Class Ability | Phoenix Dive |
| Aspects | |
| Heat Rises | You may shoot and use abilities while gliding. You may consume your grenade to gain the Heat Rises buff for 15 seconds while inflicting Cure to yourself and nearby allies. Heat Rises gives +70 Airborne Effectiveness. Airborne kills grant melee energy. |
| Touch Of Flame | Your Healing Grenade's Cure and Restoration effects are stronger. |
| Fragments | |
| Torches | Powered melee hits grant Radiant to yourself and nearby allies. |
| Empyrean | Solar weapon and ability kills extend the duration of Restoration and Radiant. -10 Resilience |
| Ashes | You inflict more Scorch stacks. |
| Searing | Defeating Scorched targets grants melee energy. +10 Recovery |
This build uses Healing Grenades, Incinerator Snap, Healing Rift, and the Well of Radiance Super. Your Incinerator Snap deals great damage on its own, capable of igniting a target if you have Ember of Ashes equipped. The damage of this is greatly increased with Winter's guile, making your melee the equivalent of a Rocket Launcher shot at x5 stacks. Healing Grenades grant x2 Restoration when needed, and Healing Rift gives you another means of healing if your grenade is on cooldown. We would use Phoenix Dive, but its x2 Restoration buff is too short to extend with Empyrean.
Aspects focus on improving your abilities. Heat Rises gives you melee energy with any midair kill, and you can consume your grenade to heal yourself and nearby allies while gaining a ton of Airborne Effectiveness. Touch of Flame is great for buffing your Healing Grenade, increasing its Restoration buff to x2. If you're playing more casual content and want to speed up your playstyle, swap Touch of Flame for Icarus Dash.
Fragments are focused on buffing your melee. Torches gives you a constant damage buff. Empyrean will give you permanent 25% more damage and x2 Restoration if you're getting kills. To help your melee, Ashes is used to let a single snap inflict an Ignite, and we use Searing to get even more melee energy.

| Mobility | Dump |
| Resilience | 100 |
| Recovery | Preference |
| Discipline | 40+ |
| Intellect | 40 |
| Strength | 70+ |
Get your Resilience to 100 first, as it gives 40% damage resistance. Recovery is up to you since this build has permanent x2 Restoration. The only other stat you should focus on is Strength for situations where your Incinerator Snap needs a sliver more energy to come back.
Armor(Element) | Mod Slots |
|---|---|
Helmet(Arc) |
|
Gloves(Solar) |
|
Robes(Any) |
|
Boots(Any) |
|
Bond(Any) |
|
Mods for this build focus on assisting your other ability cooldowns. Hands-On and Impact Induction help with your Super and grenade cooldowns, respectively. Be sure to use DR mods on your chest, and equip the Flame Harvesting mod on your bond to easily create Elemental Wells with your Solar Exotic of choice.
| ARMOR MODS (COMBAT STYLE) |
|---|
| Helmet | Seeking Wells |
| Gloves | Bountiful Wells |
| Robes | Heavy Handed |
| Boots | Melee Wellmaker | Explosive Wellmaker |
| Bond | Elemental Charge |
This setup gives you a ton of Elemental Wells without needing to do any strange gameplay loops. Melee or explosive kills (pick your favorite) will spawn two Elemental Wells, granting 20% ability energy. These Elemental Wells will move to your location and grant x2 Charged with Light, which is then used to refund 50% melee energy on your next Incinerator Snap. Snap, grab the Wells, and repeat
Return to Table of Contents
PvE: Scattered Atoms
Why Play This Build?
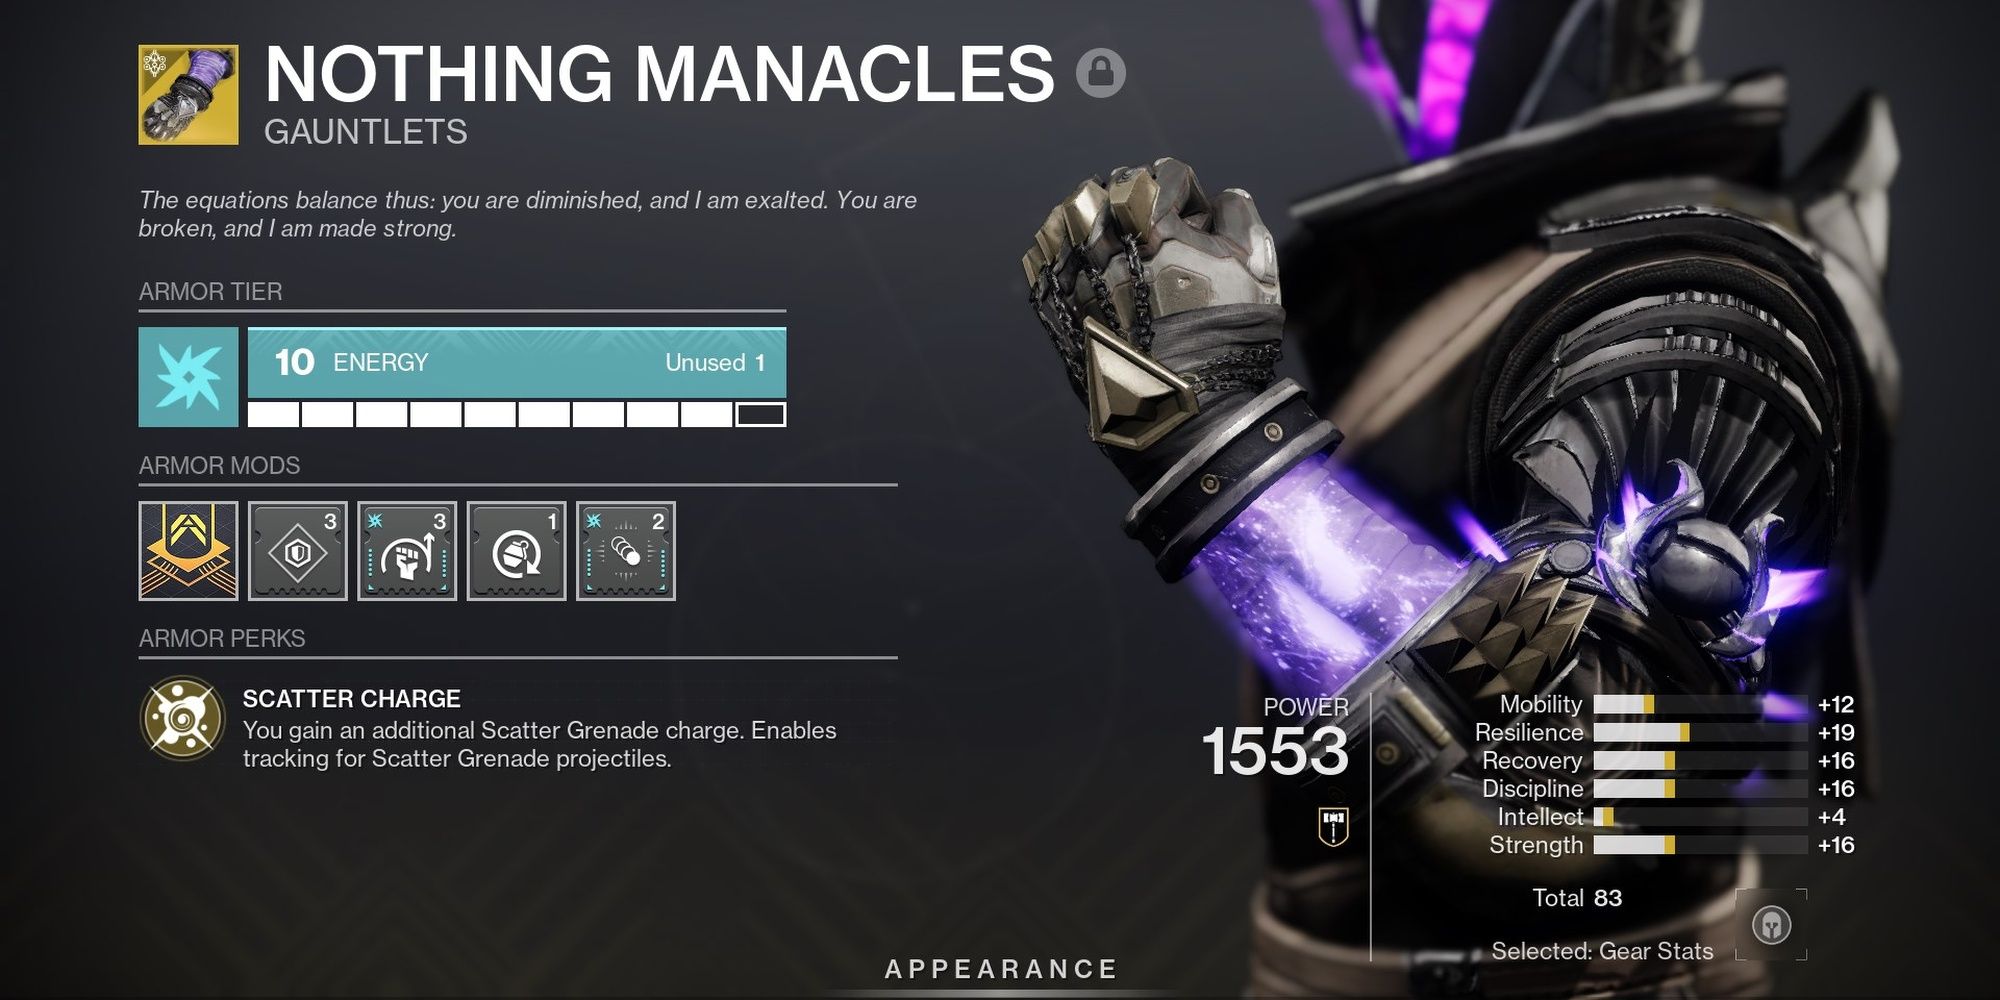
Scatter Grenades are back with a vengeance. This build uses the Nothing Manacles Exotic from Season of the Lost and pushes them to their limit. Thanks to the tracking buff they received in The Witch Queen expansion, Scatter Grenades are far more consistent and deal great damage.
With Void 3.0's Aspects and Fragments system, we can further enhance these grenades with weaken and the ability to proc Devour, granting further grenade energy with each kill. Paired with Combat Style mods, you'll become a walking explosion that can throw grenades with reckless abandon.
| Subclass | Voidwalker (Void) |
|---|---|
| Exotic | Nothing Manacles |
| Weapon | Weapons with Demolitionist |
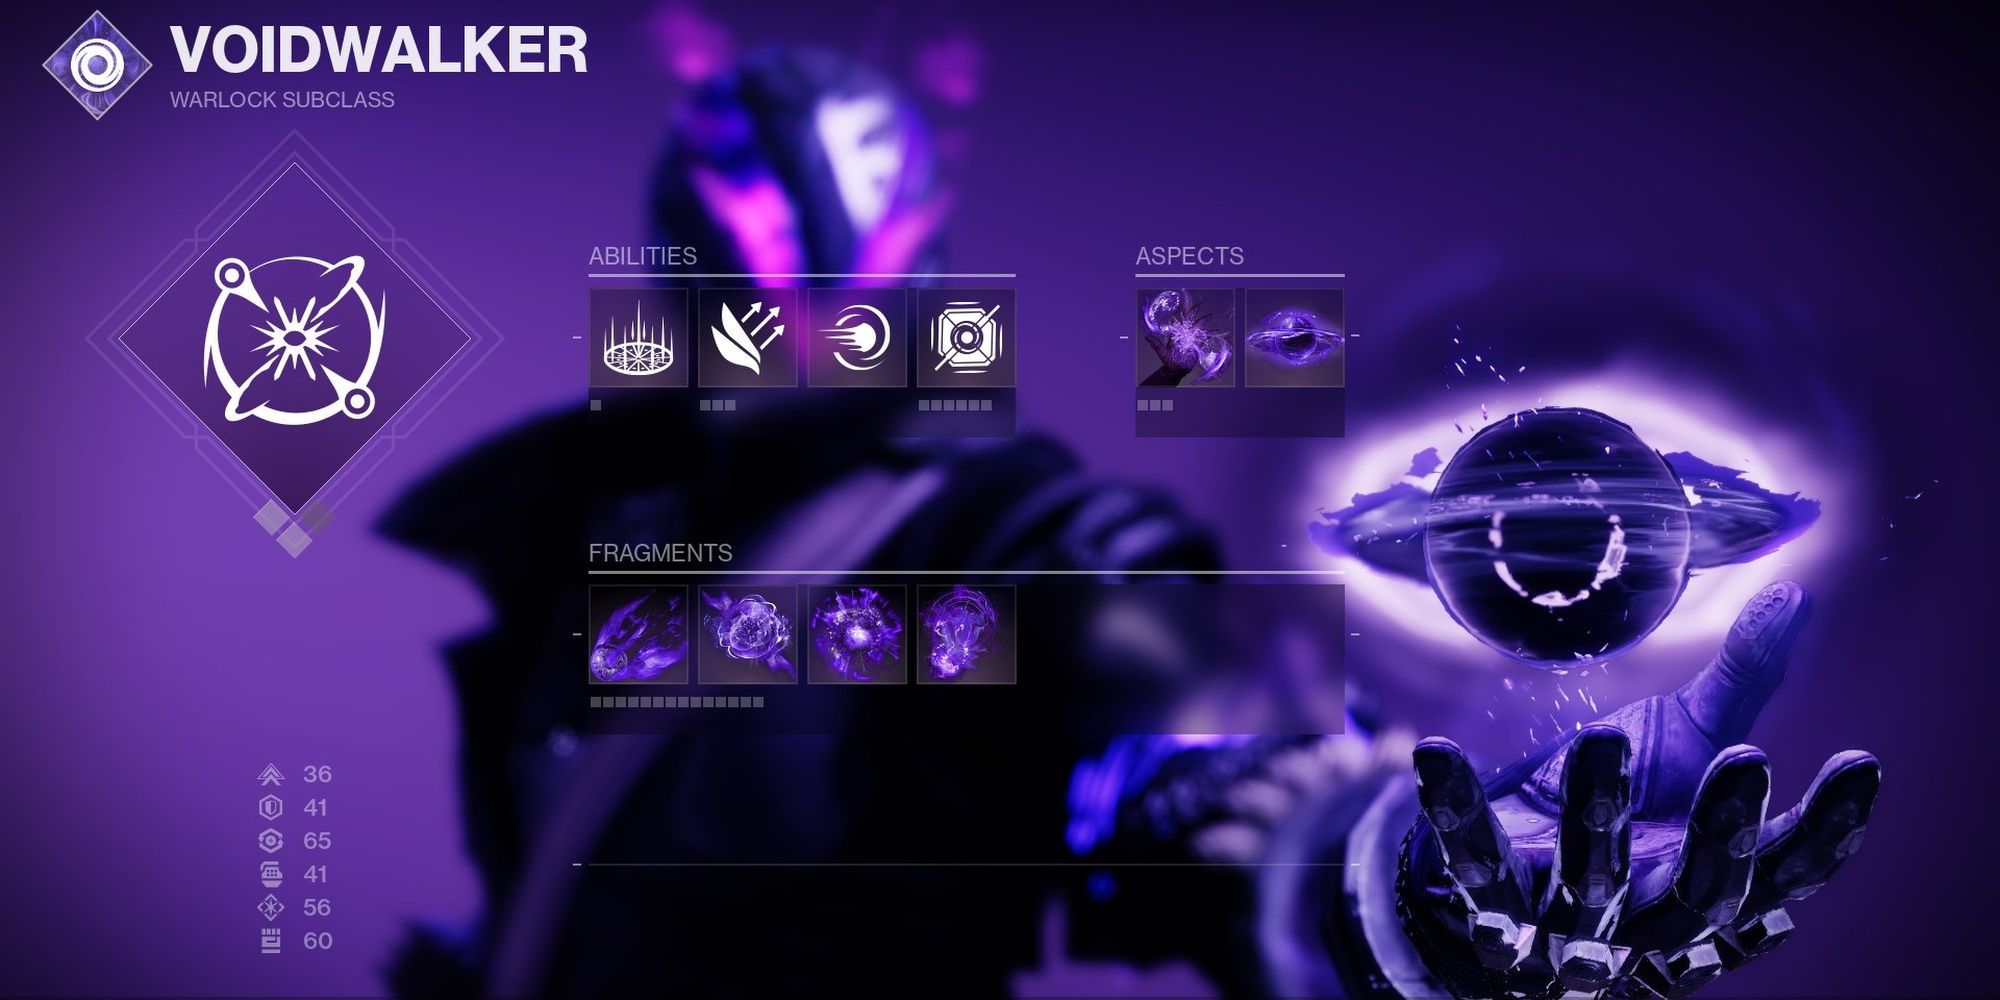
Voidwalker (Void) got reworked in The Witch Queen expansion to use the Aspect and Fragments system. We can use Scatter Grenades alongside a few Aspects to dish out some absurd punishment. We cover the exact subclass configuration in the next section.
Nothing Manacles give your Scatter Grenades tracking and a second grenade charge. The tracking isn't as good as it was in the original Destiny, but it's enough to prevent the projectiles from colliding with one another, making this grenade far more consistent.
Weapons with Demolitionist play best with this build. Our favorite weapon to pair with this setup is Corrective Measure, the Machine Gun obtained from the Vault of Glass raid. It can roll with Demolitionist and Adrenaline Junkie, the only Void weapon in Destiny 2 that can obtain this perk combo. Give this weapon Volatile Rounds, and you're in for a fun time. Traveler's Chosen is a great alternative.
| Abilities | |
|---|---|
| Super | Nova Bomb: Cataclysm |
| Grenade | Magnetic Grenade |
| Melee | Pocket Singularity |
| Class Ability | Healing Rift |
| Aspects | |
| Child Of The Old Gods | Spawn a Void Soul upon casting your Rift. Damaging a target will launch the Void Soul to their location, weakening them while dealing damage. Void Soul restores ability energy while dealing damage. |
| Feed The Void | Ability kills grant Devour. |
| Fragments | |
| Persistence | Extends the duration of Void buffs, including Devour. -10 Recovery |
| Undermining | Your Void grenades weaken targets. -20 Discipline |
| Instability | Defeating targets with grenades grants Volatile Rounds to your Void weapons. +10 Strength |
| Expulsion | Void ability final blows cause targets to explode. +10 Intellect |
This build uses Scatter Grenades, Pocket Singularity, Healing Rift, and the Cataclysm version of Nova Bomb. The only impactful options are Scatter Grenades—the grenade type you need for Nothing Manacles to work—and Healing Rift, allowing Child of the Old Gods to give ability energy with each damage tick.
Aspects for this build include Child of the Old Gods and Feed the Void. Feed the Void gives you Devour with each ability kill, and Child of the Old Gods gives you additional energy simply for using your Rift.
Fragments are all about making your grenades and buffs even stronger. Persistence extends the duration of Devour. Instability grants Volatile Rounds for ten seconds when your grenade kills someone, helping your add-clear. Undermining makes Scatter Grenades debuff targets, ensuring that the grenades kill red bars while weakening tougher foes to your weapons. Expulsion makes your Void abilities detonate enemy corpses when they're slain. This is great for further enhancing this build's add-clearing potential.
| Mobility | Dump |
| Resilience | 100 |
| Recovery | Preference |
| Discipline | 80+ |
| Intellect | Dump |
| Strength | Preference |
Focus on Discipline and Resilience in that order. Discipline helps with getting your grenade back, while Resilience allows you to take far more damage.
Armor(Element) | Mod Slots |
|---|---|
Helmet(Any) |
|
Gloves(Arc) |
|
Robes(Any) |
|
Boots(Any) |
|
Bond(Arc) |
|
There's nothing specific you need for this setup to work. Equip whichever mods sound the most useful to you. Radiant Orbs is a great pick this season, allowing this build to have a constant 25% damage buff.
| ARMOR MODS (COMBAT STYLE) |
|---|
| Helmet | Elemental Time Dilation |
| Gloves | Seeking Wells |
| Robes | Well of Tenacity |
| Boots | Elemental Ordnance |
| Bond | Font of Might |
This setup causes your grenades to spawn a Void Well on kill. These Wells grant eight seconds of 40% damage resistance and 13 seconds of 25% bonus damage for your Void weapons. Seeking Wells ensures that the Well will reach you once it spawns. If you want to make a more general build, you can use Bountiful Wells and multiple Elemental Ordnance mods to spawn a ton of Void Wells with each grenade kill; it's up to you.
Return to Table of Contents
PvE: Chaotic Hold

Why Play This Build?
Have you wondered what most top-tier players use to solo dungeons and other pinnacle content? It's this build. In essence, you'll be using Controverse Hold and Voidwalker to throw constant supercharged Vortex Grenades, turning even the toughest of enemies into stardust. It's a low-risk, high-reward build that virtually every player can use.
You can take this build even further with Combat Style mods. This build can take full advantage of Elemental Wells, allowing you to enhance your ability cooldowns. It's easy to build, deals immense amounts of damage, and can be used in Destiny 2's toughest activities.
| Subclass | Voidwalker (Void) |
|---|---|
| Exotic | Contraverse Hold |
| Weapon | Preference |
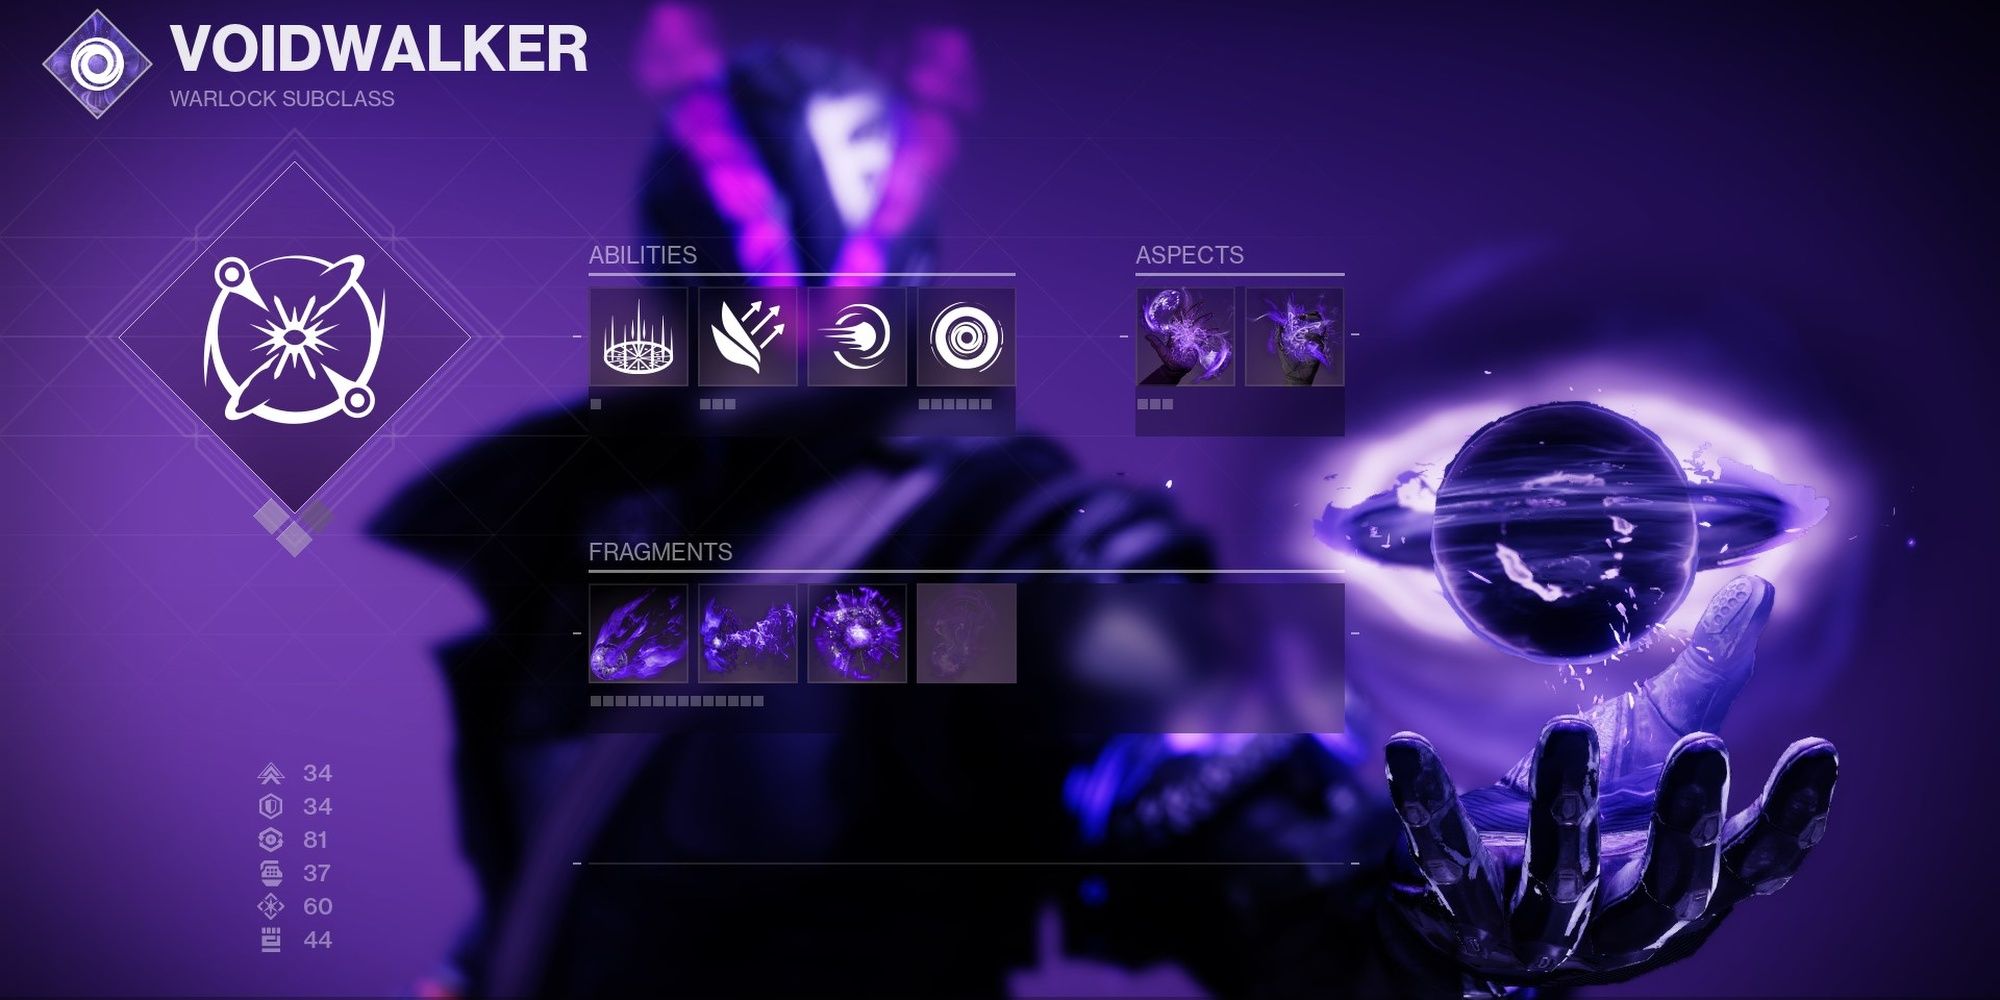
Voidwalker (Void) allows you to overcharge your Vortex Grenades with the Chaos Accelerant Aspect, giving them increased duration and much more damage. Aspects and Fragments takes this even further.
Contraverse Hold is mandatory. These gloves are what allow you to spam grenades, granting a random amount of grenade energy whenever your grenades damage someone. Since Vortex Grenades persist for multiple seconds, Contraverse Hold activates multiple times in one grenade.
Weapons are down to what content you're tackling. Use whatever is needed.
| Abilities | |
|---|---|
| Super | Nova Bomb: Cataclysm |
| Grenade | Magnetic Grenade |
| Melee | Pocket Singularity |
| Class Ability | Healing Rift |
| Aspects | |
| Chaos Accelerant | Hold the grenade key to overcharge your grenade. Vortex Grenades cover a wider area and last longer. |
| Feed The Void | Void ability kills grant Devour. |
| Fragments | |
| Remnants | Vortex Grenade last longer. |
| Undermining | Your Void grenades weaken targets. -20 Discipline |
| Expulsion | Void ability final blows cause targets to explode. +10 Intellect |
This build uses Vortex Grenades, Pocket Singularity, Healing Rift, and the Cataclysm version of Nova Bomb. Vortex Grenades deal absurd damage when overcharged, and any ability kills will help you survive by proccing Devour.
Aspects for this build include Chaos Accelerant and Feed the Void. Feed the Void gives you Devour with each ability kill, and Chaos Accelerant is needed to overcharge your Vortex Grenade, causing it to deal much more damage for a longer duration.
Fragments focus on buffing your grenade. Expulsion causes targets to explode on death, and Remnants makes your Vortex last longer to help proc Contraverse Hold's Exotic perk. Undermining is used to buff the damage of your grenade.
| Mobility | Preference |
| Resilience | 100 |
| Recovery | Preference |
| Discipline | 100 |
| Intellect | 40 |
| Strength | Dump |
Resilience is needed to give you damage resistance against all attacks. Beyond that, focus on Discipline.
Armor(Element) | Mod Slots |
|---|---|
Helmet(Any) |
|
Gloves(Any) |
|
Robes(Any) |
|
Boots(Any) |
|
Bond(Any) |
|
This build's armor setup is quite flexible. Use whichever mods you're most comfortable with or can fit the correct Combat Style mods.
| ARMOR MODS (COMBAT STYLE) |
|---|
| Elemental Wells | |
|---|---|
| Helmet | Elemental Time Dilation |
| Gloves | Well of Tenacity |
| Robes | Elemental Ordnance |
| Boots | Well of Tenacity | Well of Life |
| Bond | Seeking Wells |
This Elemental Well configuration is focused on solo content, generating Void Elemental Wells on grenade kills. You'll also gain 40% damage resistance for a short time.
Return to Table of Contents
PvE: Fusion Priest
Why Play This Build?
Turn the battlefield into a hellscape of explosions and Elemental Wells with this rather simple Solar 3.0 build. This build uses the Starfire Protocol Exotic to give grenade energy whenever you deal damage inside an Empowering Rift. Shoot a few bullets, throw a grenade, and repeat.
Your grenades will explode three times instead of once, deal absurd damage to fodder enemies, have competitive DPS in raids, all while having excellent survivability. If that wasn't enough, your grenades can spawn four Elemental Wells at a time, giving you constant health regen and nearby allies 40% ability energy.
| Subclass | Dawnblade (Solar) |
|---|---|
| Exotic | Starfire Protocol |
| Weapon | Witherhoard or Anarchy |
Dawnblade (Solar) has access to one of the strongest grenades in Destiny 2. Fusion Grenades, when paired with Touch of Flame, output some absurd damage.
Starfire Protocol gives you Fusion Grenade energy while dealing damage inside an Empowering Rift. Grenade kills refund your class ability, creating an intuitive gameplay loop of constant grenade and Rift spam.
Witherhoard and Anarchy are your best bets in terms of Exotic weapons. While standing in an Empowering Rift or Well of Radiance, each tick of damage will regenerate a large chunk of grenade energy. Deploy a Rift, shoot a Witherhoard round, and spam your grenade button to your heart's content.
| Abilities | |
|---|---|
| Super | Well of Radiance |
| Grenade | Fusion Grenade |
| Melee | Celestial Fire |
| Class Ability | Empowering Rift |
| Aspects | |
| Icarus Dash | You may dash midair once every four seconds. With Heat Rises active, you can dash twice every four seconds. Midair multikills and Super final blows grant Cure to yourself. |
| Touch Of Flame | Your Healing Grenade's Cure and Restoration effects are stronger. |
| Fragments | |
| Torches | Powered melee hits grant Radiant to yourself and nearby allies. |
| Empyrean | Solar weapon and ability kills extend the duration of Restoration and Radiant. -10 Resilience |
| Ashes | You inflict more Scorch stacks. |
| Eruption | Ignites have increased area of effect. +10 Strength |
This build uses Fusion Grenades, Celestial Fire, Empowering Rift, and the Well of Radiance Super. The star of the show is your Fusion Grenade. Thanks to the Aspects and Fragments used, a single Fusion Grenade will explode not once but three times—twice from Touch of Flame, and a third time from the subsequent Ignite. The add-clearing potential of this is nothing short of incredible, and it deals enough damage to be a viable DPS strategy in raids and Master-tier content. Be sure to use Empowering Rift for Starfire Protocol to work.
Aspects for this build include Touch of Flame and Icarus Dash. Touch of Flame lets your Fusion Grenade detonate twice, effectively doubling the grenade's damage. It's more than double when you account for the guaranteed Ignite via our Fragments. Icarus Dash is nice for repositioning and fits the grounded nature of Starfire Protocol better than Heat Rises.
Fragments focus on buffing your grenade. Ember of Ashes is mandatory, increasing your Scorch stacks inflicted for each Fusion explosion. This causes all grenades to Ignite, creating a massive explosion that deals great damage. Ember of Torches gives this build a source of Radiant, and Ember of Empyrean lets you extend the Radiant and Restoration buffs through grenade kills. Finally, we use Eruption for a boost to the Fusion Grenade's Ignite AoE. If you'd like more melee energy, replace Eruption with Searing.

| Mobility | Dump |
| Resilience | 100 |
| Recovery | Preference |
| Discipline | 70+ |
| Intellect | 40 |
| Strength | Preference |
Resilience is your main stat, granting a ton of damage resistance at all times. From there, spec for Discipline.

Armor(Element) | Mod Slots |
|---|---|
Helmet(Solar) |
|
Gloves(Arc) |
|
Robes(Any) |
|
Boots(Any) |
|
Bond(Any) |
|
Once again, the focus is on your grenades. Ashes to Assets helps charge your Well of Radiance Super faster, and Momentum Transfer gives you melee energy every time your Fusion Grenades damage someone. The only other notable mod in this setup is Classy Restoration, an Artifact mod that grants x2 Restoration when you cast Empowering Rift. Paired with Ember of Empyrean, you can keep this buff active most of the time.
You might want to consider Revitalizing Blast on this build as well. Replace Ember of Eruption with Char, and stunning a Champion will cause them to Ignite for their entire stun duration. In other words, stunning a Champion will make them explode four or five times in a row.
| ARMOR MODS (COMBAT STYLE) |
|---|
| Helmet | Well of Life | Font of Might |
| Gloves | Seeking Wells |
| Robes | Elemental Ordnance |
| Boots | Explosive Wellmaker |
| Bond | Bountiful Wells |
Since this build doesn't struggle with survivability or ability uptime, giving your team bonus energy is a good idea. This configuration is focused on spawning as many Elemental Wells as possible to help you and your allies recharge their abilities. Elemental Ordnance and Explosive Wellmaker can trigger off a single Fusion Grenade. With Bountiful Wells equipped, one Fusion Grenade can spawn four Elemental Wells.
Seeking Wells makes it easier to grab your Wells, and Well of Life gives a constant HP regeneration effect whenever you grab a Solar Well. It's not nearly as quick as the Restoration buff, yet you can benefit from both effects simultaneously. Feel free to replace Well of Life with Font of Might if you're using a Solar weapon.
Return to Table of Contents
PvE: Bleak Flame
Why Play This Build?
Raw firepower isn't always the answer. Sometimes, all you need is a little bit of crowd control to turn the tide. That's what this build focuses on. By using the Bleak Watcher Aspect, Shadebinders can turn their grenades into Stasis turrets that reliably freeze enemies. This build focuses on fast grenade cooldowns so you can spawn as many of these turrets as possible, making this an excellent build for Grandmaster Nightfalls, Master Lost Sectors, and raids.
Bungie might have nerfed the cooldown rates of Bleak Watcher in the 30th Anniversary Pack, but there are still a few ways to enhance the cooldown of your turrets. So long as you're willing to farm for a good Stasis weapon, this build is still more than viable for all Destiny content, including raids and GM Nightfalls.
| Subclass | Shadebinder (Stasis) |
|---|---|
| Exotic | Osmiomancy Gloves OR Verity's Brow |
| Weapon | Headstone Legendaries OR Le Monarque |
Shadebiner (Stasis) is required to spawn Bleak Watcher turrets. We'll cover the Aspects and Fragments in the next section.
Verity's Brow is excellent for content where you aren't significantly underleveled. Killing enemies with your Energy weapon will significantly speed up your grenade cooldown. For endgame content, Osmimancy Gloves are absurd, granting immense grenade energy when Coldsnap Grenades freeze a target. You also gain two grenade charges, making it easy to juggle between spawning Bleak Watchers and Coldsnap Grenades.
Anything with Headstone is absurdly strong on this build, allowing you to proc Whisper of Shards and Verity's Brow. Eyasluna is a notable Stasis weapon, capable of rolling with Headstone and Unrelenting simultaneously. It also assists with AoE add-clear. Le Monarque is a good long-range option for quickly shattering a group of enemies.
| Abilities | |
|---|---|
| Super | Winter's Wrath |
| Grenade | Coldsnap Grenade |
| Melee | Penumbral Blast |
| Class Ability | Healing Rift |
| Aspects | |
| Bleak Watcher | Press and hold the grenade button to convert your grenade into a Stasis turret that fires slowing projectiles at nearby targets. |
| Iceflare Bolts | Shattering a frozen target spawns seekers that track and freeze other nearby targets. |
| Fragments | |
| Fissures | Increases the damage and size of the burst of Stasis when you destroy a Stasis crystal or defeat a frozen target. |
| Durance | Bleak Watcher turrets last longer, and enemies are slowed for a longer duration. +10 Strength |
| Chains | Gain 40% damage resistance while near a Stasis crystal or frozen enemy. +10 Recovery |
| Hedrons | Gain +60 Mobility, Resilience, Recovery, increased weapon Stability and aim assist, and +20 Airborne Effectiveness for 12 seconds upon freezing a target. -10 Strength |
This build uses Coldsnap Grenades and Healing Rifts. Coldsnaps are absurdly strong with Osmiomancy Gloves, granting just about your entire grenade back if they freeze a few targets. This makes it perfect for creating Bleak Watcher turrets.
Aspects focus on crowd control. Bleak Watcher lets you convert your Coldsnap Grenades into turrets that slow and freeze targets. Iceflare Bolts let you freeze even more targets, letting you freeze just about every enemy in a room with a single turret or grenade.
Fragments assist with improving your neutral game and turrets. Whisper of Durance lets your turrets last longer. Chains grants 40% DR if you're near a frozen target, and Fissures makes that enemy take far more damage when shattered. Finally, Whisper of Hedrons gives you a ton of bonus stats with incredibly high uptime.

| Mobility | 40 |
| Resilience | 100 |
| Recovery | 40 |
| Discipline | 100 |
| Intellect | 40+ |
| Strength | Dump |
Get as much Resilience as possible, as this stat gives you damage resistance. Get your Mobility and Recovery to 40 so Hedrons can cap those stats at 100. For cooldowns, focus on Discipline.
Armor(Element) | Mod Slots |
|---|---|
Helmet(Any) |
|
Gloves(Any) |
|
Robes(Any) |
|
Boots(Solar) |
|
Bond(Any) |
|
These mods focus on granting your grenade back as fast as possible. Casting your Rift grants grenade energy now, and so do Orbs of Power. You can also replace the second mod on your Bond with an Artifact mod.
| ARMOR MODS (COMBAT STYLE) |
|---|
| Helmet | Taking Charge |
| Gloves | Firepower |
| Robes | Firepower |
| Boots | Firepower |
| Bond | Firepower |
Firepower's effect stacks the more mods you have equipped. Four will grant 60% grenade energy upon throwing your grenade.
If you don't own Firepower, Elemental Well mods make for a solid substitute. Elemental Armaments with an Osmosis/Headstone weapon will create Stasis wells that will reduce your grenade cooldown by 10% per well. Should you use Elemental Wells, the other three Firepower mods can be replaced with Elemental Well mods that suit your playstyle.
Return to Table of Contents
Source: https://www.thegamer.com/destiny-2-best-warlock-builds-pvp-pve/
0 Response to "Strike Fire Orbs Destiny 2 Warlock Easy"
Post a Comment